It’s cold, and I’m shivering under the dark night sky. Out of breath from hiking up the mountain above 9,000 feet elevation, I set up my camera for a shot. I enjoy creating compositions of the night sky; composition is my favorite aspect of photography. I choose a horizontal view to include the arch of the Milky Way through the frame, with Jupiter near the center and a volcanic eruption on the Big Island of Hawaii in the distance. I wait until the dense part of the Milky Way gases are visible, which, at this time of year in May, is now almost 1 a.m. I love photographing the full moon with mountains or a crescent moon on the horizon, but what I delight in the most is photographing the glowing Milky Way band as it stretches across the sky. It is glorious. I feel the expanse of the universe under the many stars. Pressing the shutter, I know this shot will be a favorite.
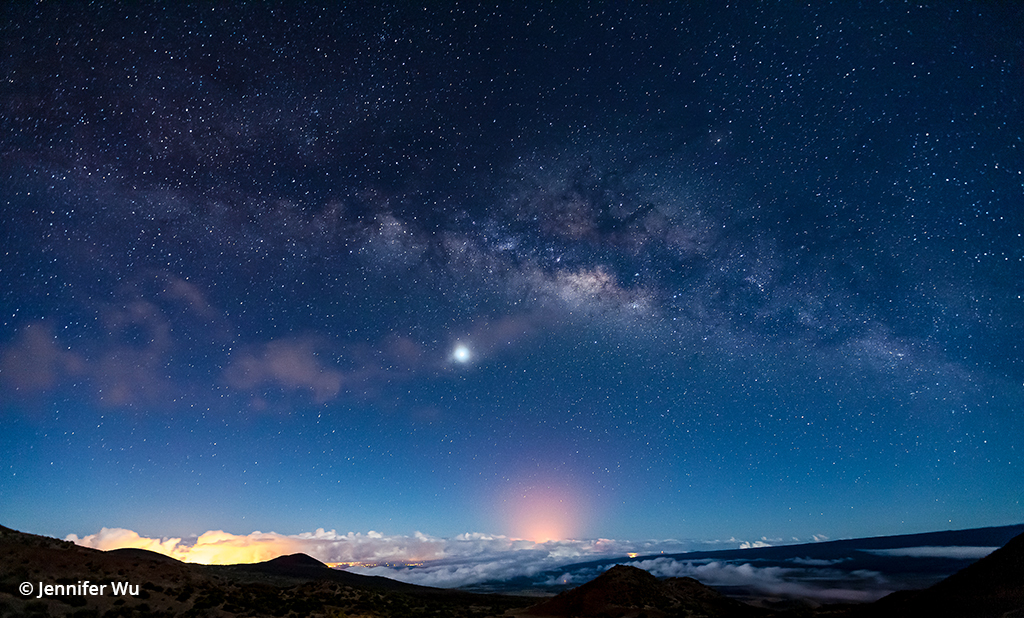
Fire in the Hole, Big Island of Hawaii. The Milky Way, seen as a band across the sky with an erupting volcano in the distance, creates the pink and reddish glow in the sky. At the base of the frame are the silhouetted mountains of Maunakea. The pleasing warm glow on the lower left of the frame comes from the light pollution of the city of Hilo. I choose a 16mm focal length to allow for more of the Milky Way arch to be included. Canon EF 16-35mm f/2.8L II USM at 16mm. Exposure: 30 secs., ƒ/2.8, ISO 3200.
Hiking back to the car and wanting to share the experience with my sister, I wake her less than gently. “Bec, you must wake up and see the stars. There are so many here, and it is magnificent.” She’s in a tank top, shorts and flip flops and wrapped in a blanket for warmth as she looks out into the night, exclaiming, “Wow!” as I point out the volcanic glow from the eruption that started the previous day after years of dormancy on the Big Island of Hawaii. She follows up by saying, “You are crazy, out here in these places by yourself.” I exclaim, “It’s thrilling!”
My approach to photography is to enjoy it and have fun. Just the enjoyment of seeing the stars is awe-inspiring, and photographing them allows me to be creative. While the experience is pleasurable, there are times it is more difficult. What makes me want to withstand the cold night and be sleep-deprived? Why would I want to deal with not being able to see as I would in daylight hours and create compositions in the dark? How do I handle the frustration of when I am not creating photographic images I like? The difficulties make it even more rewarding.
Night Photography Challenges
If I got amazing shots every time, it would not be special when I got the one I had been striving for. My inspiration for night photography came to me when seeing night shots of Yosemite Falls and stars lit by the full moon. Then, in 2007, I went on a trip to the Bristlecone Pine Forest. The high heat of the summer days turned bitter cold at night. Photographing during the new moon instead of full moon, I didn’t know what to expect. I took the shot and was enthralled. Photographing the Milky Way with its hidden colorful gasses revealed. The stars that were too dim for me to see now filled the frame. Magic.
The next morning, I reviewed the images only to find a black screen. The images were underexposed; what I thought was a good exposure was not. My eyes had adjusted to the dark and gave me a false impression of a proper exposure. Next time, I would use the histogram to check exposure.
When difficulties arise—stars or the foreground captured out of focus, or perhaps too much dark silhouetted area in the frame making for a poor composition—I do my best to think of them not as problems but as obstacles to overcome. I became dedicated to resolving each challenge to my satisfaction until I finally began to create the images you see here.
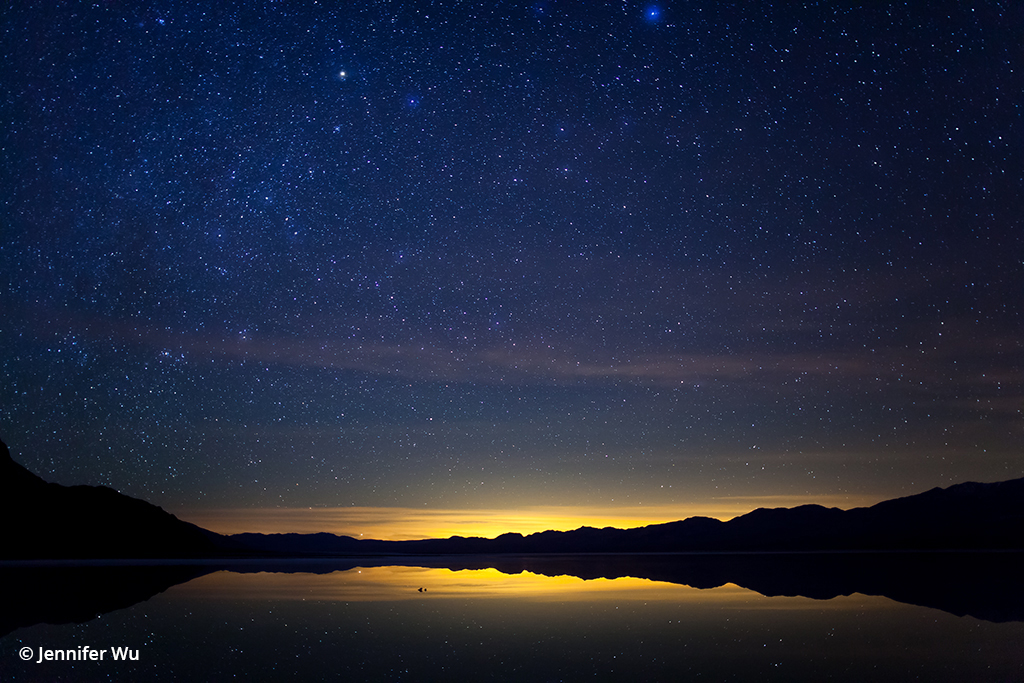
Horizon Light, Death Valley National Park. I took this in the winter after a recent rain when there wasn’t any wind, and that allowed for reflection of the stars in the calm waters. This image was created the day after the new moon, when no moon is present in the sky, causing a dark night that increases the visibility of stars, even at a low elevation. Framing the foreground in the lower fourth of the frame, I placed the horizon line off-center to focus attention on the night sky. Purposefully having the mountains as silhouettes against the horizon light created more drama in the image, and the mountains have a pleasing balance as they rise up and open toward the edges of the frame with a mirrored effect from the left to right sides. I chose to photograph in the direction of the light pollution of the distant city lights, creating a beautiful sunset-like glow on the horizon, with my white balance set to 3400 Kelvin to create the blue-toned sky. Canon EF 24mm f/1.4L II USM. Exposure: 20 secs., ƒ/1.6, ISO 2000.
While leading a photography night workshop in Death Valley over 10 years ago, I said to a participant, “I was hoping for clear skies for our visit to the Racetrack and night shoot.” He replied with something about being happy with what we have in any situation. I agreed, as I prefer that perspective yet had forgotten that in the moment. I noticed I become disappointed when the weather is not as photogenic as I would like, or I am not making compelling compositions. Now, I strive to be happy regardless of the weather and situations. “Enjoy the life,” as my best friend’s father says to me.
Soon after that, we had left the Racetrack and were at another location on our way back when the cloudy skies started clearing. We photographed the stars, and because we didn’t have the right conditions earlier in the evening, everyone seemed very excited. It was even more rewarding to get the unexpected opportunity. Unexpected images can bring me even more joy than the ones I carefully plan out.
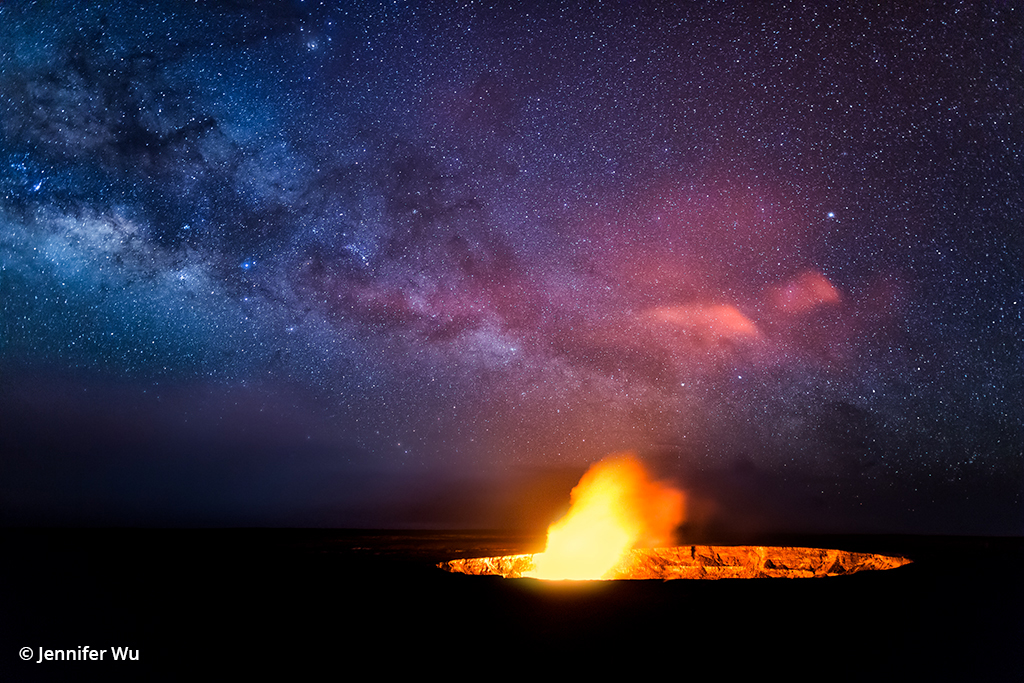
Hawai’i Volcanoes National Park. Photographing volcanic activity is a thrilling, awe-inspiring experience. Here, the Kilauea Caldera provides a compelling foreground to the Milky Way. On this night, the volcano emitted a strong glow. Due to the high contrast in light from the caldera versus the night sky, I combined 3-stop and 2-stop hard-edge graduated neutral density filters to create the equivalent of a 5-stop filter over the bottom of the image to hold detail in the crater’s edge. Even that was not enough to fully correct for the bright volcanic activity, so I darkened the bright area in processing for a more pleasing light balance. Canon EF 24mm f/1.4L II USM. Exposure: 20 secs., ƒ/2.0, ISO 3200.
On another photography trip to the Big Island of Hawaii in winter, there were storms with heavy rains and strong winds for a week. I wasn’t getting the photographs I hoped for and was disappointed until I remembered to “enjoy the time” regardless of the situation. I challenged myself to go out and find something interesting to photograph in the rain, like botanicals. After the week was over, my friend arrived on the first day of clearing skies. Excited, we went up to the mountains to photograph, and it was even more rewarding after a difficult week.
JENNIFER WU VIDEO TUTORIAL
Night Sky Photography Techniques
This free video presented by B&H Photo explains everything you need to know to get started in night photography. Watch now.
Astrophotography Dream Shots
I usually have a “dream shot” in mind as it motivates me, and I come up with new ones when inspired. I enjoy the anticipation and excitement of getting these shots. What is your night sky dream shot?
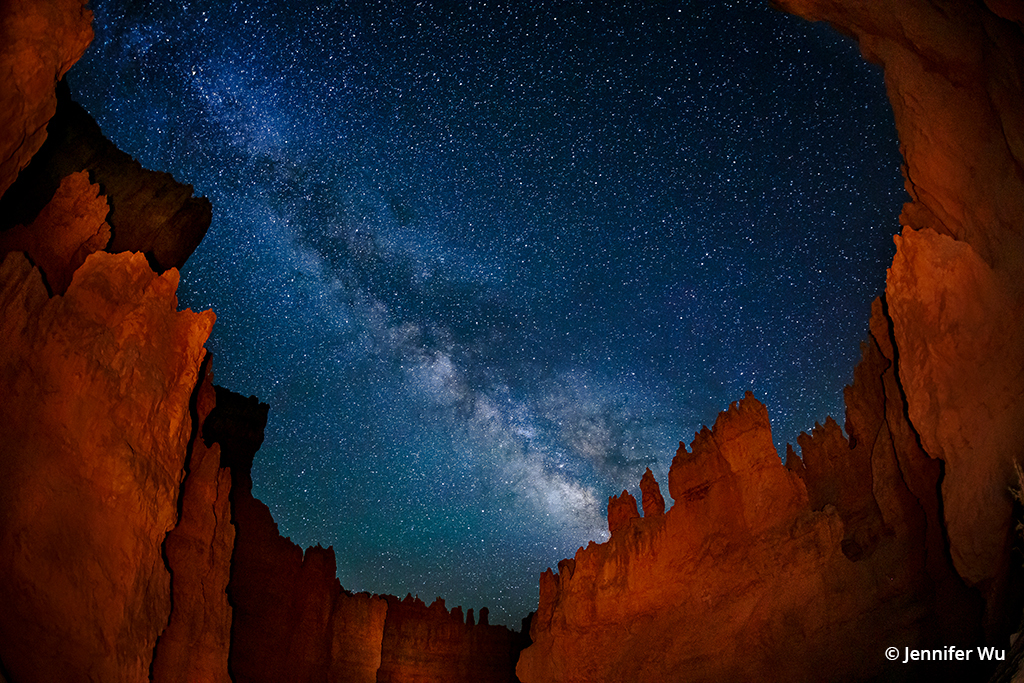
Canyon Arch, Bryce Canyon National Park. Since photographs of the stars and Milky Way often appear similar, I look for an interesting foreground perspective to make a unique image. During the day, I scouted around the canyons and looked up to see these canyon walls supporting the sky above. I choose the fisheye lens to enhance the curvature of the canyon walls that reach up toward the sky and took some test images. Returning later that night, I used a large flashlight with a warming gel to light paint the scene for the entire exposure of 25 seconds, ƒ/2.8, ISO 6400. As I painted, I spent more time on the distant walls to even out the light since the walls farther away would be dimmer due to the falloff of the light source.
I recall another particularly challenging situation when photographing a meteor shower. I took a few meteor photographs, and yet I desired something more, something special. A big meteor with the Milky Way. During the night, there were many meteors, but only a couple of big meteors streaked across the sky, and then I was either changing lenses or pointing the camera in the opposite direction. My dream shot slipped away.
Feeling out of sync, I created new plans for photographing the next four nights around the peak of the meteor shower. I headed out to Lake Tahoe and photographed all night long with two cameras to make sure to get a shot. There were only a few meteors that night. After sunrise, with sleepy eyes from lack of rest, I set off to find a campground and get some rest during the daylight.
Returning the following night, I played with two cameras. I made varying compositions with one and set up the other to create a time-lapse of the Milky Way moving from right to left in the frame, allowing for a composition that worked well throughout the night as I photographed. In the middle of the night, a bright meteor lit the sky, and I was thrilled to get a beautiful meteor shot.
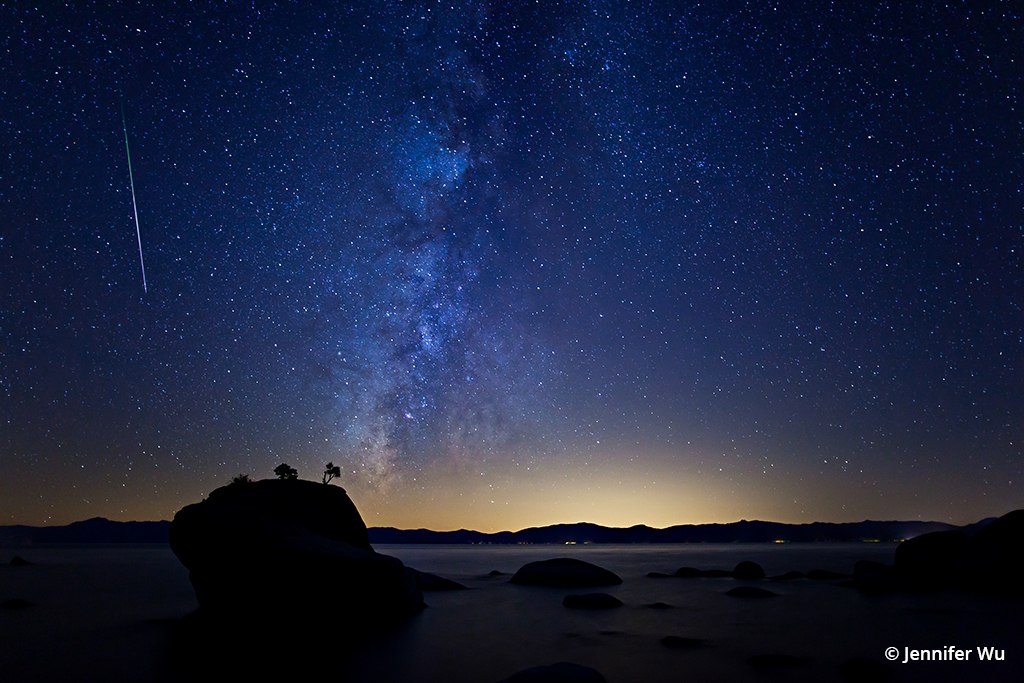
The Milky Way and a meteor above Bonsai Rock, Lake Tahoe. Canon EF 24mm f/1.4L II USM. Exposure: 20 secs., ƒ/1.4, ISO 1250.
Satisfied with my results, I left my cameras there photographing time-lapse as I fell asleep. I had not seen anyone the entire time at this location, so it seemed safe to leave them for a couple hours. I headed back to the campground and slept longer than anticipated, sleeping through my alarm. I returned after sunrise, and, luckily, my cameras were still there.
Next, I drove to Yosemite, but on the way, I was very tired. Halfway there, I pulled over to a campground and rested before continuing on. Once in Yosemite National Park, I went to Olmsted Point, high in the mountains, with a breathtaking view down the canyon with Half Dome in the distance. In the daylight hours, I walked around and took some test shots to find the compositions I wanted to use. Returning that night, I set up at my predetermined location with one camera pointing northeast, from which direction the Perseids meteor shower radiates. I pointed my other camera toward the Milky Way and Half Dome for a more compelling composition.
Many people were watching the meteor show at this location on the peak night. I wanted to give it my best and stay up all night, as I knew I had to remain with my cameras this time. I used an intervalometer and set it to have a two-second delay between shots for continuous shooting all night except when changing batteries.
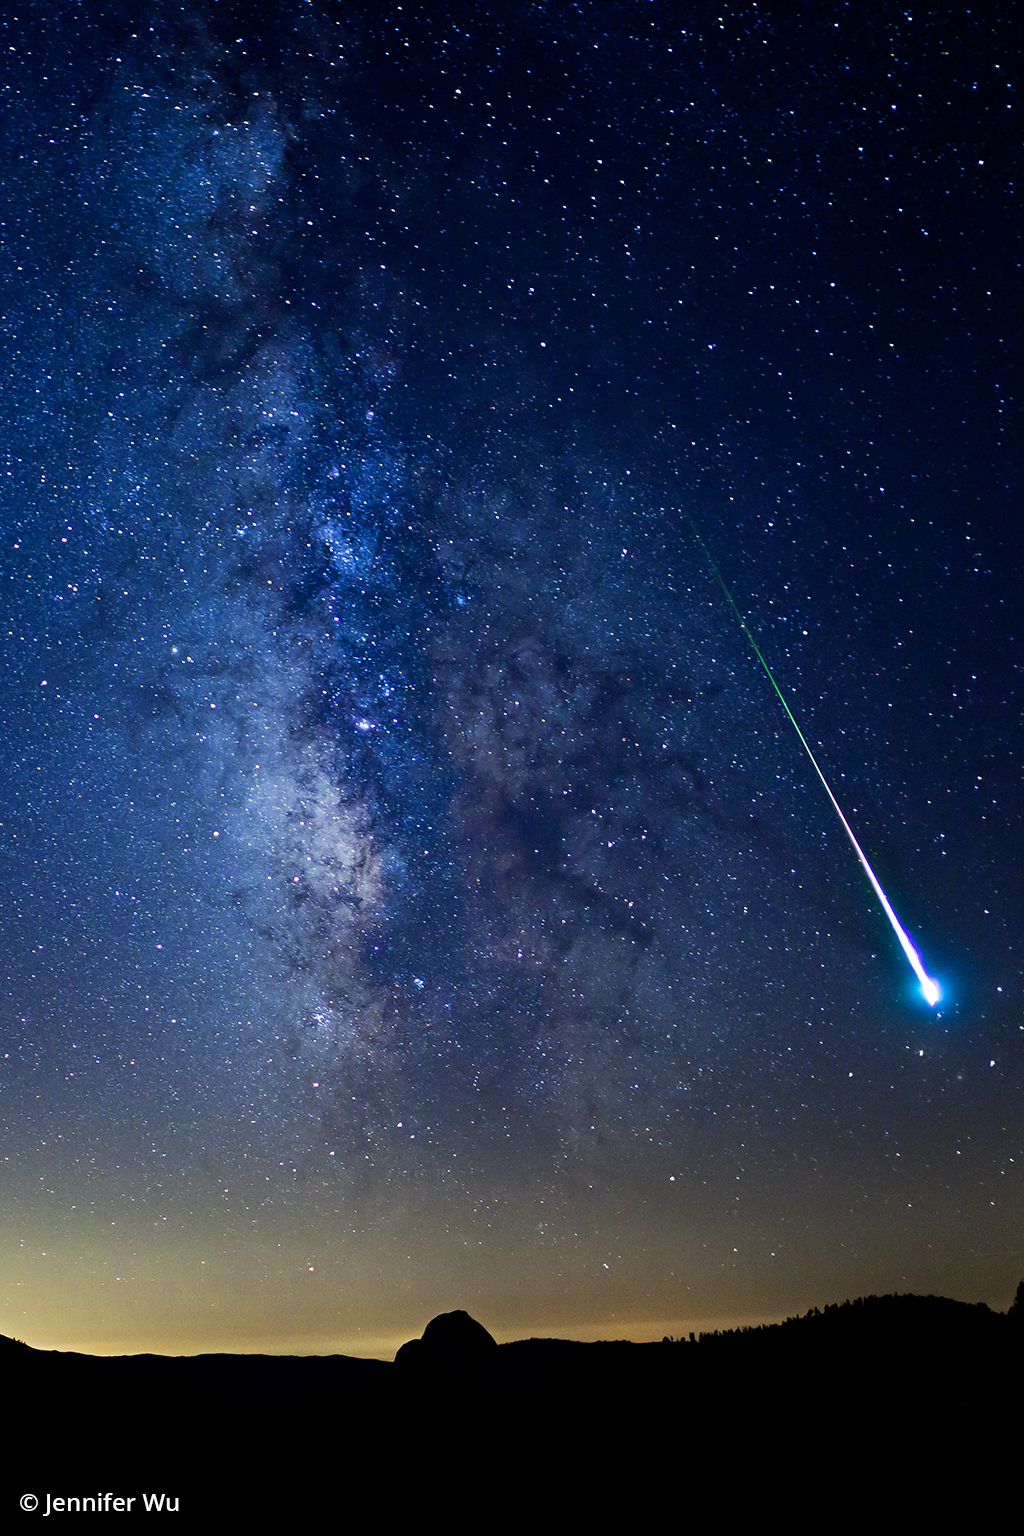
View from Olmstead Point, Yosemite, as a meteor streaks across the sky above Half Dome. Canon EF 24mm f/1.4L II USM. Exposure: 20 secs., ƒ/1.4, ISO 1600.
My friend called to me while I observed the meteor show. We watched it together and saw a really large one. At the same time, we exclaimed “Wow!” The meteor lit the landscape, and I was happy that my cameras were photographing. Later, when I went to look at the image on the back of the camera, I screamed out loud, “I got it!” I am sure the others watching the stars thought I was a bit weird, but it was a magical moment photographed. I had captured a dream shot.
I smiled and relaxed under the stars and meteors while I looked over my cameras until the sky started to brighten. Barely able to stay awake, I left to get some shut-eye.
Journeys Under The Stars
The next day, the moon was much brighter, a large crescent moon. I hiked to Upper Cathedral Lake, bringing winter gloves and a down coat in the mid-August summer heat, prepared for the cold night ahead. Arriving at the lake, I scouted around for a good vantage point, found a spot and set up the shoot as planned to capture the moonlight on the mountain. After the moonset, I packed up and hiked out. I got off the trail and was lost for a bit but found the trail again and returned to camp with enough time to get a little sleep before sunrise. I got up to photograph Tuolumne Meadows at dawn and then drove back home.
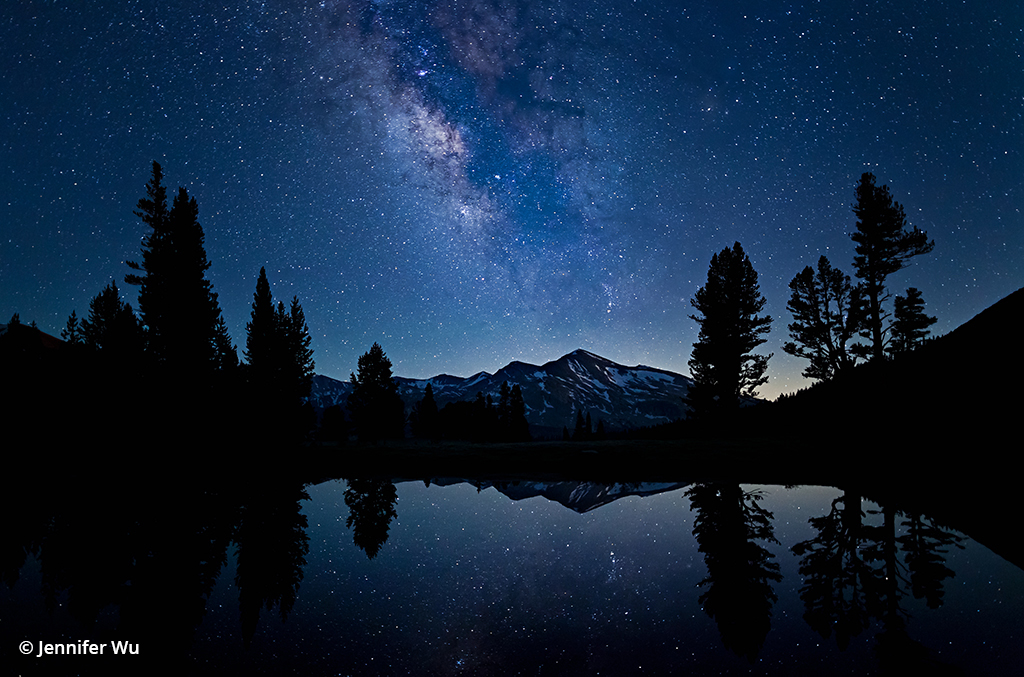
Reflections of Stars, Yosemite National Park. Persistence was the key to getting this shot. There were many nights I didn’t get the shot I wanted, such as when the lake water rippled from the wind, making the night sky reflections disappear. On this night, the wind was calm, and I got what I envisioned. I like the moonlight in this image. The sidelight is hazy and dimmer on the mountains than it would be with frontal light and creates more depth to the mountain. The moon is to the right of the mountain, just outside the frame. Canon EF 24mm f/1.4L II USM. Exposure: 20 secs., ƒ/1.4, ISO 500.
This is how I go about a photography trip. I decide where I want to go and check the new moon cycle or celestial sky events to plan around them. When on location, I spend all my time traveling, photographing, scouting, or downloading and processing images when not eating and sleeping. I often go by myself, though I like company, too. However, most of my friends don’t like photographing all the time as I do. It brings me great pleasure. When I get that joyful feeling as I press the shutter, I know I have the composition I desire.
When I review an image, I ask myself, “Is it a print?” By that I mean, is it worth processing, printing, framing and hanging on a gallery wall? If so, I know I got the shot. I aspire to remind others of the beauty of the natural world and the stars. There is something so special, so refreshing about seeing the moon and stars. Perhaps it reminds me of how small we are in this vast universe. I hope to inspire in others a sense of awe as they view the magnificence of the night sky, a reminder that we are all connected.
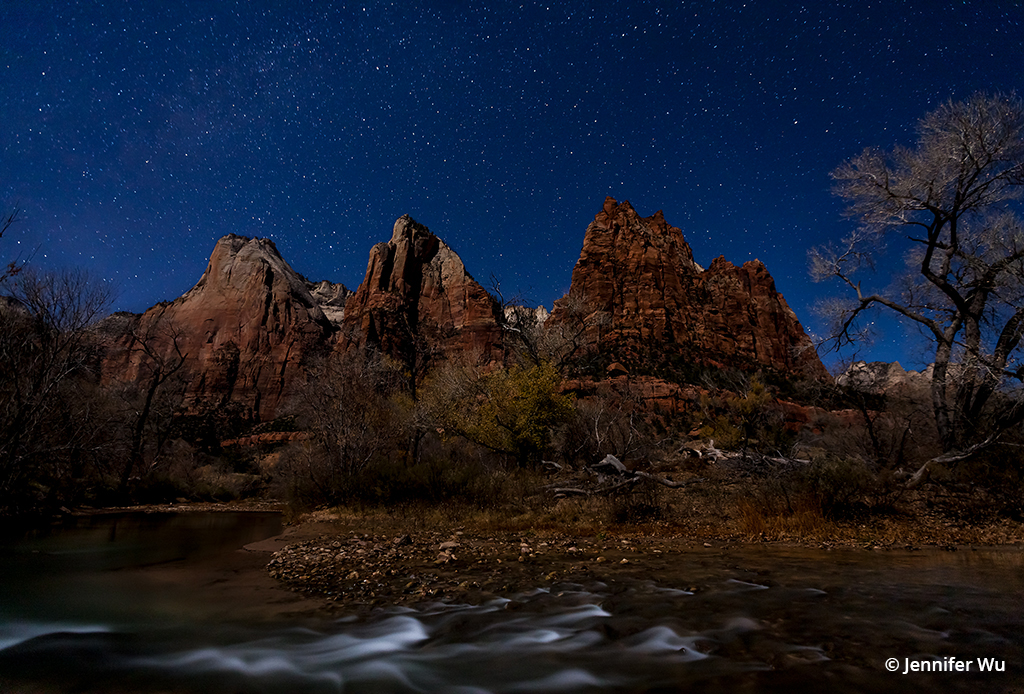
Moonlit Mountains and Moving Water, Zion National Park. The mountains and foreground were lit by a half moon positioned high up in the sky and behind me to my left. There was not much going on in the sky with the bright moon, so I did not include too much of it, instead making the composition about the river and mountains. Wearing waterproof boots, I carefully stepped to a sandy bar going farther into the rushing river. My friend called out, “If you slip, hold up the tripod and camera, and I will save the gear.” Never mind that I would be swept down the river! Proceeding cautiously, I wanted the close foreground element to create depth in the image in contrast with the main subject, the moonlit mountains. I used a 16mm focal length to get close to the foreground for greater depth of field. The effects of the water softened by the long exposure are an added bonus. Canon EF 16-35mm f/2.8L II USM at 16mm. Exposure: 30 secs., ƒ/2.8, ISO 1600.
I have always had a fascination with the night sky and stars. When I was young, I loved looking up at the stars in desolate areas of the mountains. I dreamed about the expanse of the universe. On a backpacking trip with my dad and sister, we had a long hike out of the mountains, then began our drive back home in the dark when my dad suddenly pulled over. We hopped out of the car and laid on the ground, looking up at a spectacular summer meteor shower. We must have seen a hundred meteorites with the advantage of the dark sky away from city lights and being at a high elevation. My dad told us, “Make a wish on a shooting star,” and, smiling, I did, feeling it would come true.
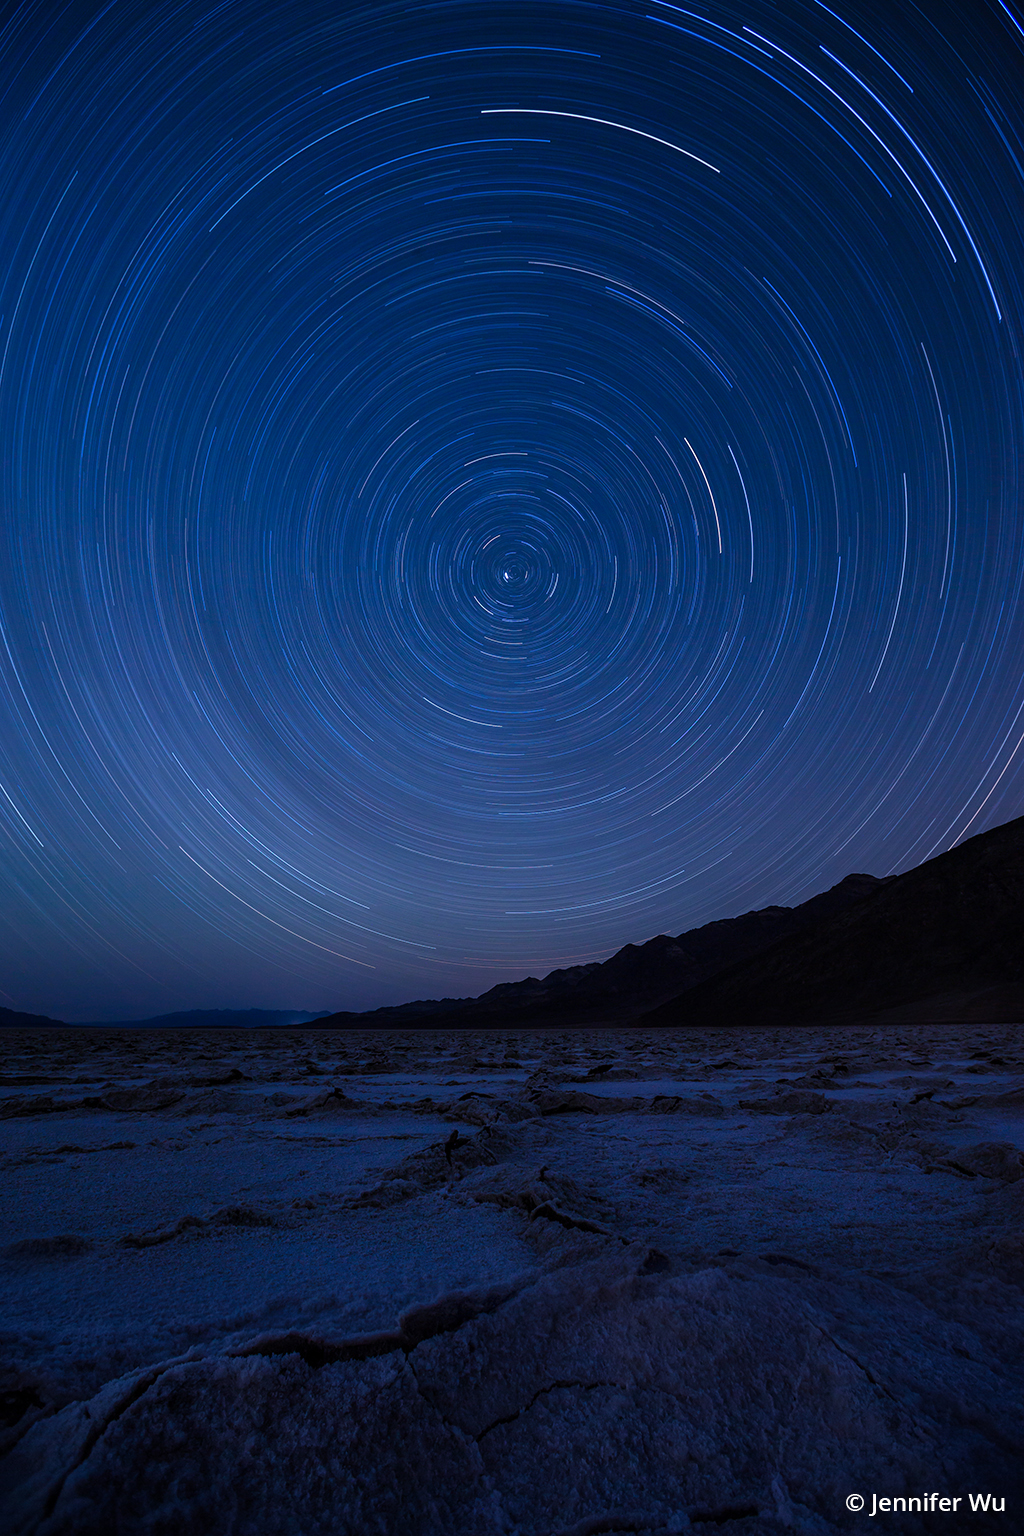
Star trails at Badwater, Death Valley National Park. Star trails are exciting to photograph, with the anticipation of the image that will be revealed after a very long time spent capturing the image. Star trails can be photographed as multiple short exposures and then stacked or as a single long exposure, the technique I used for this image. I combined it with a second exposure of the foreground. For circular star trails versus diagonal lines in the frame, use a wide-angle lens such as 14mm or 16mm to get as much of the circles as possible. Then point the camera to the north, ideally toward Polaris, also known as the North Star. It will remain a point, acting as the center axis. The stars rotate around it in concentric circles while it remains in a fixed position in the sky. I used a Canon EF 16-35mm f/2.8L II USM at 16mm for both exposures. For the first exposure, I focused the lens on the foreground with an exposure of 30 seconds, ƒ/3.5, ISO 3200. Then, with the camera left in place, I made the second exposure focusing on the stars at ƒ/5.6, ISO 100, for 2 hours and 8 minutes.
Now I can say I have lived a wish, with a connection to the stars like my connection to the people I love. I follow my heart in what I truly love to do in life and am looking forward to discovering what I will photograph next. May you reach for the stars and create beautiful night sky photographs.
See more of Jennifer Wu’s work at jenniferwu.com.
The post Reaching For The Stars appeared first on Outdoor Photographer.