Mount Rainier is an icon of the Washington state landscape. Standing at 14,410 feet above sea level, this active volcano presides over a diverse ecosystem. It’s the source of five major rivers and the most glaciated peak in the lower 48 states. The snow-and ice-covered peaks give way to ancient forests and subalpine wildflower meadows as you descend its slopes.
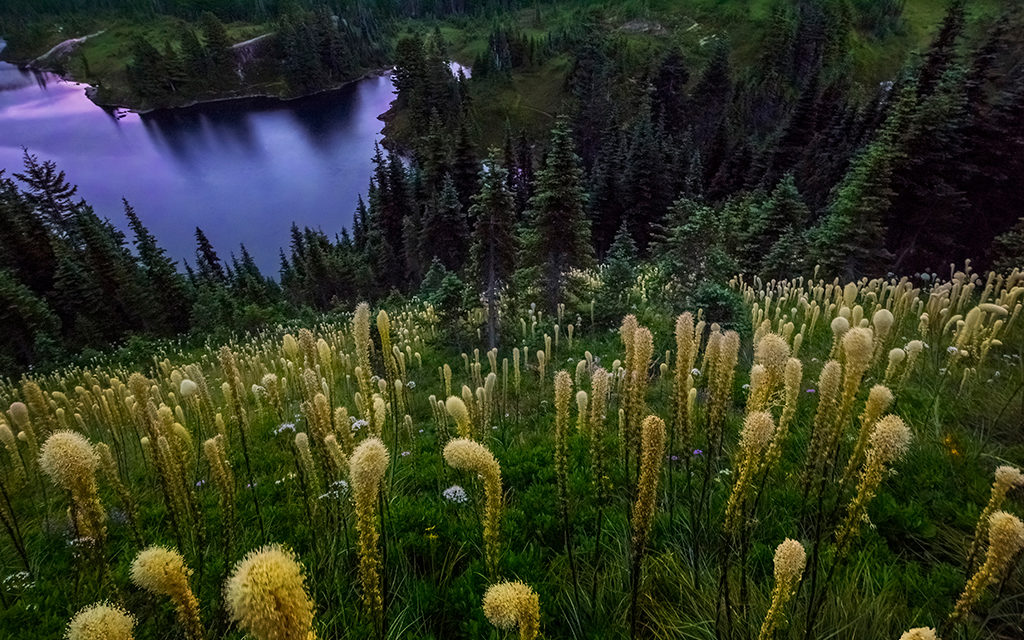
Summer season beargrass, overlooking Mount Rainier from Tolmie Peak Trail.
Mount Rainier National Park encompasses 369 square miles and contains about 240 miles of hiking trails. The park isn’t far from Seattle—about a two-hour drive—and it’s fantastic to go from the big city to this vast wilderness environment in such a short trip. Once at the park, which is very accessible for folks of all ages, you can photograph an incredible variety of beautiful scenery in relative proximity. And if you’re looking to get away from the crowds, often you can find yourself all alone on a trail after the first half mile or so.
The park consists of five areas: Sunrise, Paradise, Longmire, Ohanapecosh and Carbon River-Mowich Lake. Of these areas, the two I most recommend visiting for photography are Sunrise and Paradise. To make the most of your time in the park, you are best off splitting your time between its two sides. This will allow you to find a combination of accommodations at the base of the mountain on either side and minimize your drive times to the locations you want to shoot. Also, it is only about 45 minutes from the base to the top of the mountain. There are a few accommodation options further up the mountain, but they are often more expensive.
Four Seasons At Mount Rainier
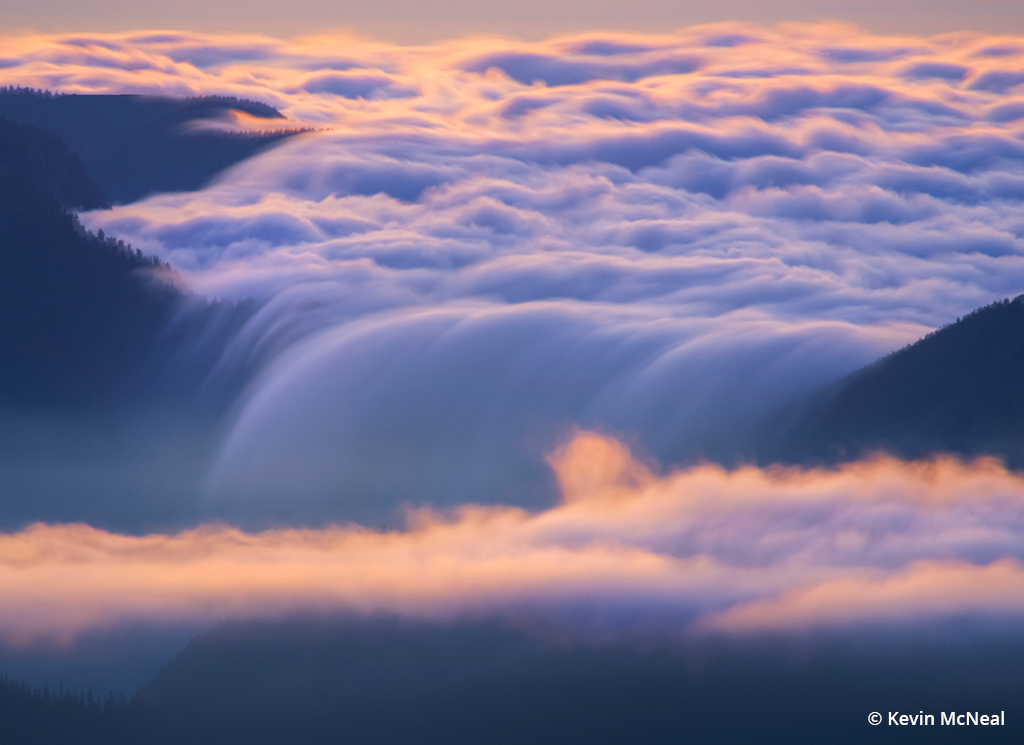
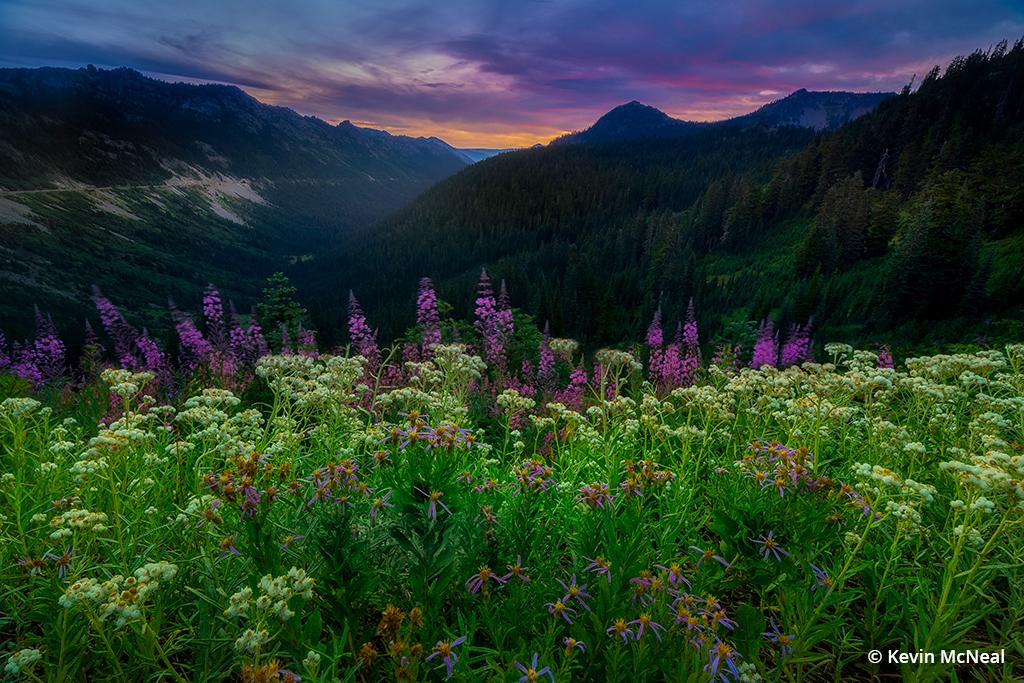
A long exposure of cloud movement overlooking the meadows of Mount Rainier from Mount Fremont.
The seasons here differ dramatically from each other, but you always have Mount Rainier as your backdrop. The consistent white snow-covered peaks of Mount Rainier accentuate the colors of both wildflowers and fall foliage. The most popular months are July through October, but there is something for photographers here year-round.
Spring
Visit in June and July. You will find ponds containing water from the melting snow, which provide an excellent opportunity to capture reflections of Mount Rainier surrounded by snow.
Summer
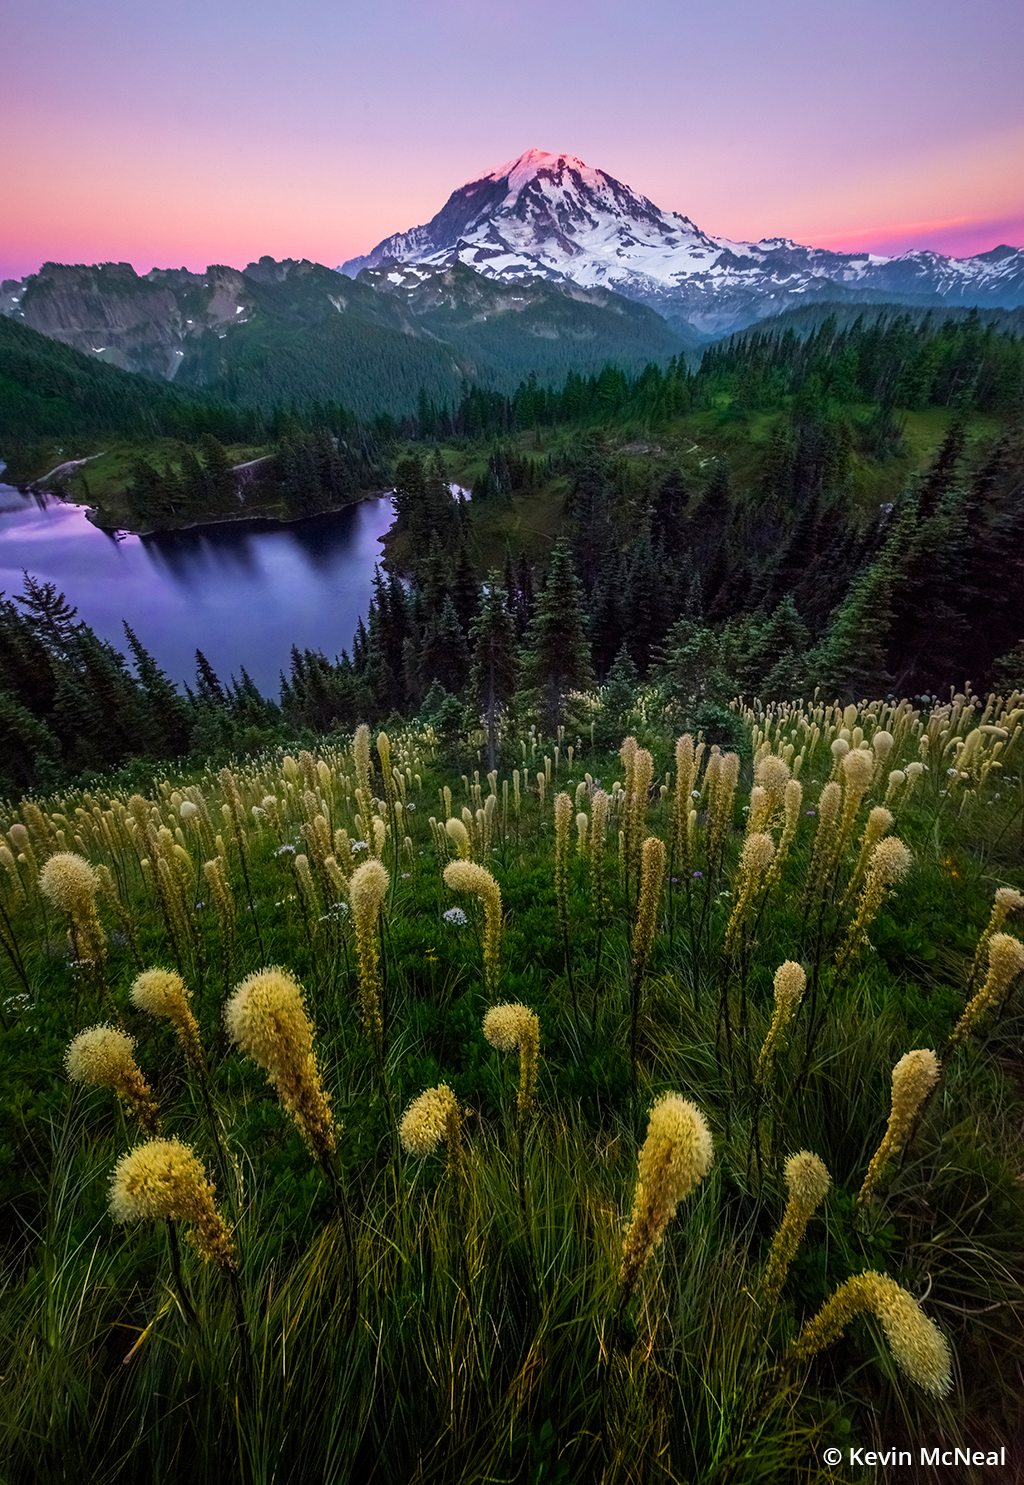
The sunlight hours are long in the summer, so if you want to shoot sunrise and sunset, be prepared to get up early and stay up late. Due to the snowpack on the mountain, you generally start to see wildflowers in late July and early August. Remember that the elevations vary around the park, so the timing of wildflower blooms can differ based on your location. When shooting wildflowers, it’s important to photograph when the light is low in the sky, at sunrise or sunset, so soft light is cast upon the flowers, minimizing harsh shadows.
Summer season beargrass, overlooking Mount Rainier from Tolmie Peak Trail.
Wildflowers will often start to bloom on the Sunrise side about one to two weeks before the Paradise side, so consider starting your trip on the Sunrise side and then moving to the Paradise side.
Fall
Autumn colors tend to start here in September due to the higher elevation. In the fall, rich, deep reds are most common in Mount Rainier, balancing well with the warm golden yellows. The combination of these reds and yellows pops against the backdrop of Mount Rainier’s white peak.
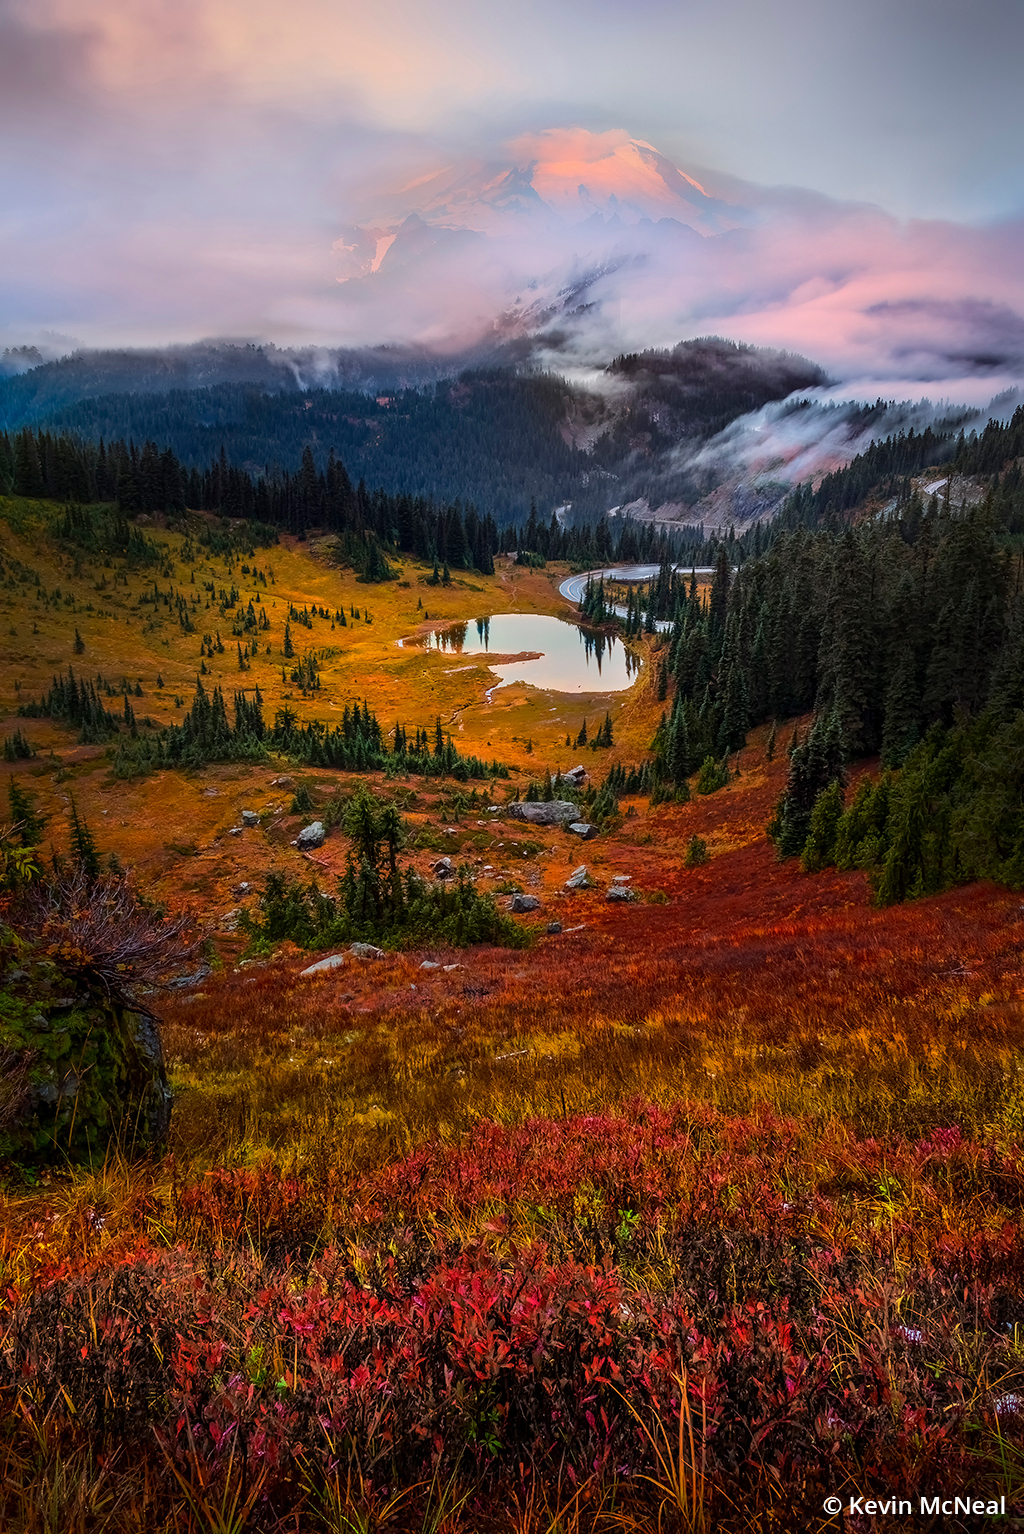
Morning mist partially covers the top of Mount Rainier during the peak of autumn season.
Winter
Although this area is stunning to photograph in the winter and has a variety of winter recreational activities, many places are inaccessible due to snow and road closures. In addition, all vehicles that travel to Mount Rainier National Park in the winter (November 1 to May 1) are required to carry tire chains. So, if you plan to visit in the winter, be sure to check the latest road status information (nps.gov/mora/planyourvisit/road-status.htm), take the necessary precautions and come prepared.
Mt. Rainier Top Spots: Paradise Side
Here are a few of my recommended locations for photography on the Paradise side of Mount Rainier.
Paradise Meadows
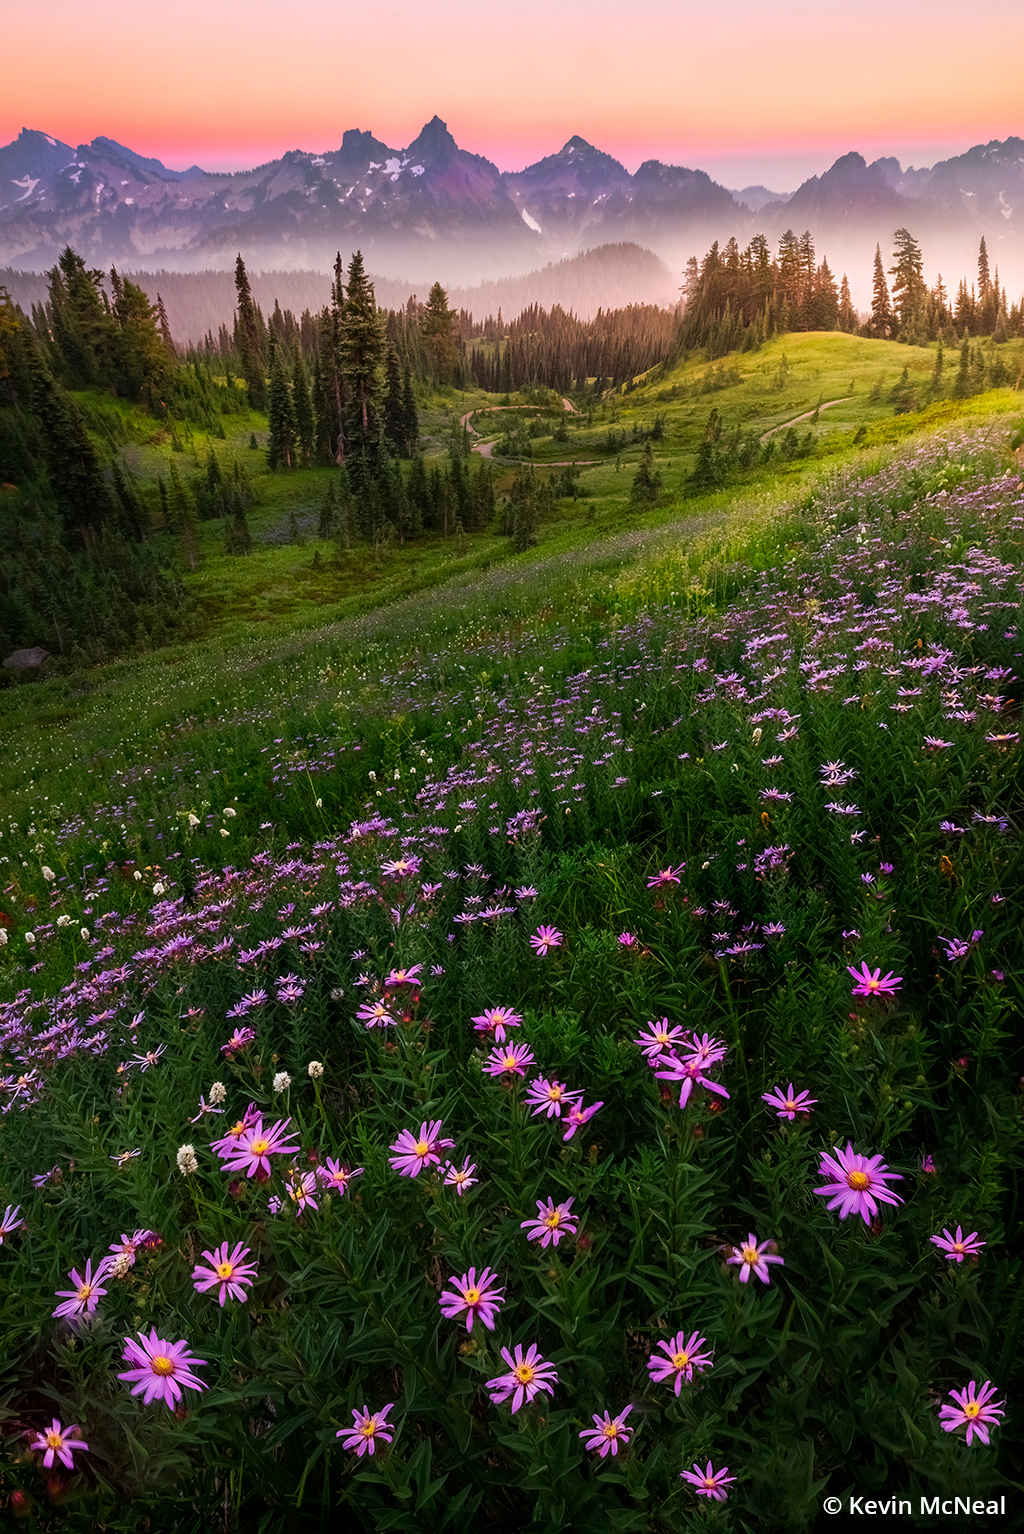
Without a doubt, my favorite location within the park to photograph is Paradise Meadows, with its combination of wildflowers and mountain views. It has the most prolific wildflowers in the area. Upon entering the park, it takes about 45 to 60 minutes to reach the Paradise parking lot, which marks the start of numerous trails throughout Paradise Meadows. You will encounter wildflowers immediately. As you continue up the path, you pass creeks and waterfalls that also inspire photographic compositions. A bonus to this area, if you hike up high enough and turn around toward the parking lot, you can photograph the Tatoosh Range at sunset. It’s a two-for-one to capture both Mount Rainier and the Tatoosh Range with wildflowers. Just remember to stay on the trails as the meadows at this 5,400-foot elevation are very fragile.
Reflection Lakes
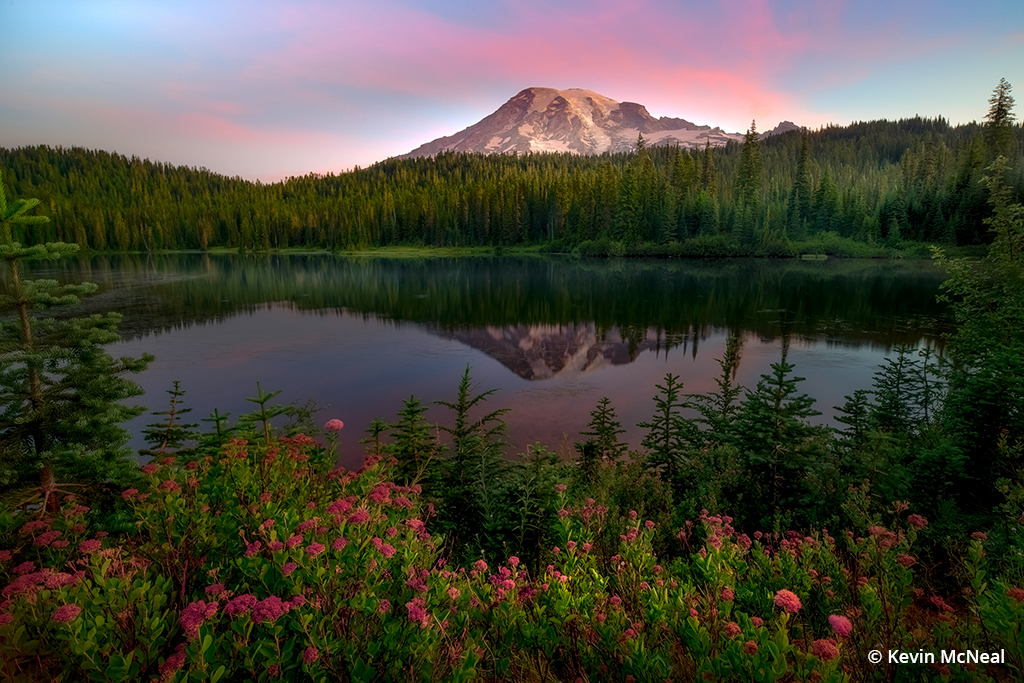
Morning sidelight on Mount Rainier from the shoreline of Reflection Lakes with spirea flowers in the foreground.
Located along Stevens Canyon Road and accessible by vehicle only during the summer months (June to September), Reflection Lakes, as the name implies, provides an idyllic view of the mountain and its reflection. There is often mist on the lakes in the early morning, and as the sun comes up and catches the rising mist, it creates a stunning sidelight on the mountain. Adding to the beauty of the reflections, the shoreline is surrounded by subalpine wildflowers that are a lovely addition to photographs.
Bench Lake
If you are looking to capture a reflection of Mount Rainier in a less-crowded area, Bench Lake is the perfect place to go. The hike to this alpine reflection lake is about 1 mile, and on a calm and clear day, you can see Mount Rainier with a perfectly pristine reflection due to the glass-like nature of the lake. From a photographer’s point of view, there aren’t many different compositions here as the payoff is the reflection, but you can be creative incorporating rocks and downed tree branches along the shoreline.
Waterfalls
There are a handful of waterfalls along the route to Paradise Meadows that are very scenic and easy to access.
- Christine Falls: Although technically in the Longmire side of the park, it is accessed via the road to Paradise. The waterfall cascades down 60 feet and is framed by the roadway’s stone bridge.
- Narada Falls: This is where the Paradise River drops 168 feet over former lava flow into the valley below. The hike down to the falls is short but steep and can be wet due to the waterfall spray. If you happen to catch a sunny day at the right time, you may see a rainbow at the base of the falls.
- Myrtle Falls: If you use the Skyline Trail from the Paradise parking lot, a 1-mile hike along this paved trail will provide you the opportunity to photograph this 72-foot plunging waterfall with Mount Rainer in the background.
Mt. Rainier Top Spots: Sunrise Side
The Sunrise side of Mount Rainier doesn’t feature waterfalls like the Paradise side, but it does have several lakes and ponds for reflections and offers a different perspective of the mountain.
The end of Sunrise Road is the highest point you can reach in Mount Rainier National Park by vehicle. The parking lot here is at an elevation of 6,400 feet and provides access to numerous hiking trails ranging from easy to difficult, so make sure to check the trail map (nps.gov/mora/planyourvisit/maps.htm) before heading out. These trails wind through ancient forests, and in the summertime, the wildflowers are spectacular and can be found within a few hundred feet of the parking lot.
Tipsoo Lake
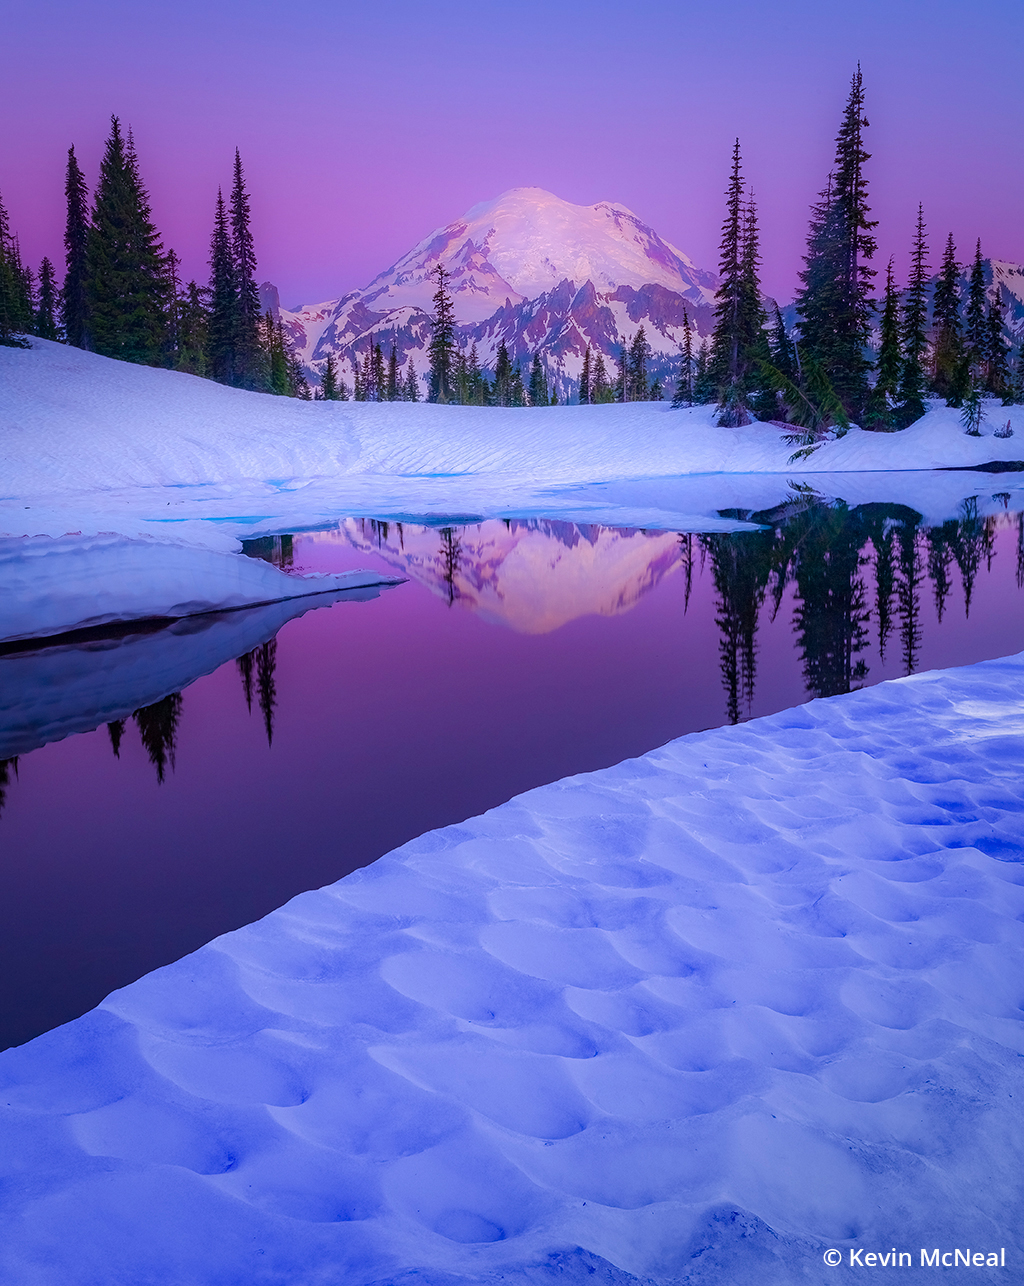
Twilight reflections over the melting snow on Tipsoo Lake with Mount Rainier in the distance.
For sunrise shoots, the early-morning sun rays cast soft light on the east-facing side of the mountain. One spot with excellent prospects for both sunrise and sunset is Tipsoo Lake. Remember to arrive at least an hour before sunset, as the sun will be hidden sooner due to the elevation here. Consider hiking up one of the trails in the area to get a higher vantage point to capture the valley, wildflowers, lake and Mount Rainier at the same time.
Sunrise Point
While making your way up to Sunrise Road, it’s worth taking a stop at Sunrise Point, as this area affords an almost 360-degree view of the Cascade Range and the valleys surrounding Mount Rainier.
Emmons Vista & Silver Forest Trail
From the south side of the Sunrise parking lot, the Silver Forest Trail is an opportunity to photograph a variety of subjects and is often overlooked. The trail is a short 1-mile hike, and along the way, you encounter stunning views of Emmons Glacier, the White River Valley and wildflower meadows as you walk amongst trees that have been bleached and charred by the weather, giving them a “silvery” color.
Naches Peak Loop Trail
This trail, which utilizes part of the Pacific Crest Trail, allows many photographic opportunities if you are looking to stretch your legs a bit. Starting from the Tipsoo Lake parking area, the 3.5-mile round trip trail offers views of Mount Rainier, Yakima Peak, some high mountain ponds and the subalpine forest and meadows. I suggest hiking this loop in a clockwise fashion if you want to get the best perspectives of the mountain. Just keep in mind that this is one of the more popular hikes in the park—you won’t be alone.
Recommended Photography Gear
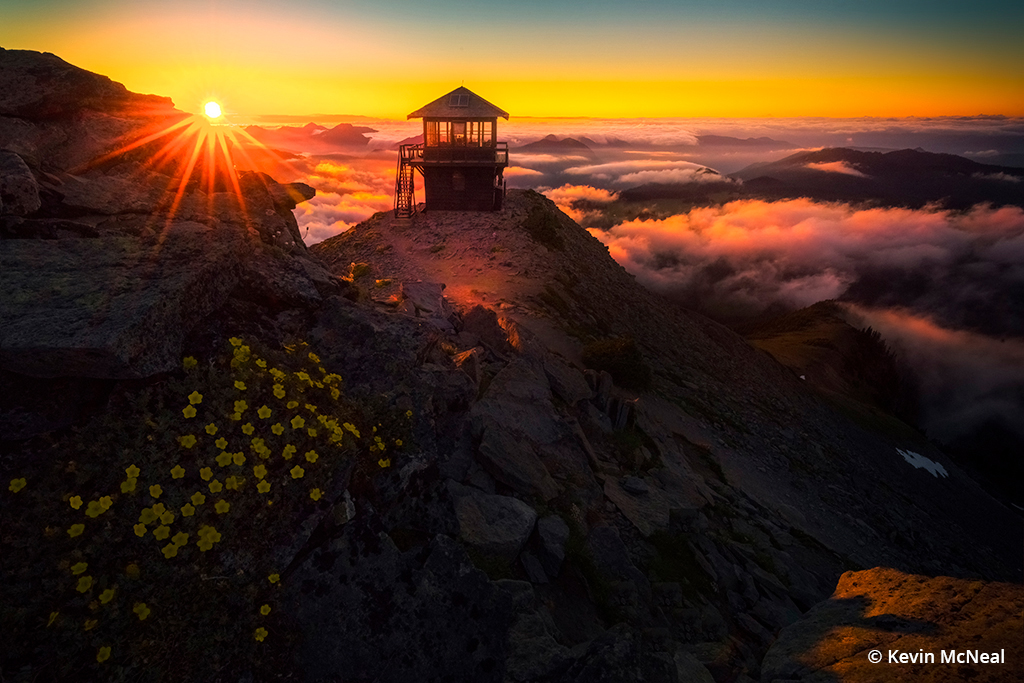
Sunset from Mount Fremont Fire Lookout as summer wildflowers balance on the foreground rocks.
Here are a few key considerations when assembling your kit for a trip to Mount Rainier.
Lenses
With the vastness of the landscape at Mount Rainier, having a wide-angle lens in the 14-24mm range is ideal. For example, when photographing wildflowers in the landscape, if you shoot close to the flowers, about 1 to 2 feet above the ground, a wide-angle lens allows you to exaggerate their size, giving viewers the sense that they can reach out and touch the flowers. I strive to find compositions that convey the experience of walking into a meadow and being surrounded by these flowers, and an ultra-wide lens helps accomplish that.
There are opportunities at Mount Rainier to be creative with telephoto lenses and macro lenses, but my “go-to” lenses at Mount Rainier are a 15mm ƒ/2.4 for shooting wildflowers on windy days—the larger maximum aperture enables faster shutter speeds to freeze movement—and a 14-24mm, which allows me to zoom in and out a little to ensure nothing is being cut off in my composition.
Filters
A neutral density filter is critical for shooting waterfalls and creeks if you are looking to “slow down” the water for a one-second or longer exposure to create that ethereal motion blur in your composition. A polarizing filter is also helpful as it brings out the blues in the sky. Just remember that these filters impact your exposure and shutter speed. If you shoot wildflowers with wind, the flowers will likely blur and lose detail in your images with these filters on the lens. To avoid this happening, photograph your wildflowers without any filters on so you can get the fastest shutter speed possible.
Wildflower Photo Tips
Fireweed at sunrise overlooking the Chinook Pass above Tipsoo Lake.
Mount Rainier is a premier destination for wildflower photography, but you can use these tips for wildflowers anywhere.
- Check local webcams and wildflower reports before you go. These are fantastic resources to determine when you might want to visit and get an idea of current conditions.
- Remove filters from your lenses, especially if conditions are windy, so that you can set the fastest shutter speed possible.
- Shoot close to the ground to emphasize the flowers.
- Find compositions where approximately two-thirds of the image are landscape and flowers, and one-third is the sky.
- Consider both horizontal and vertical compositions to provide different perspectives.
Landscape Photography Year Round
Mount Rainier National Park is a must-visit destination for landscape photographers, and every season offers a variety of different dramatic color options against the backdrop of the mountain’s snowcapped peak. With plenty of locations to photograph and a variety of natural elements to compose, Mount Rainier offers endless opportunities.
See more of Kevin McNeal’s work at kevinmcnealphotography.com.
The post Mount Rainier National Park appeared first on Outdoor Photographer.