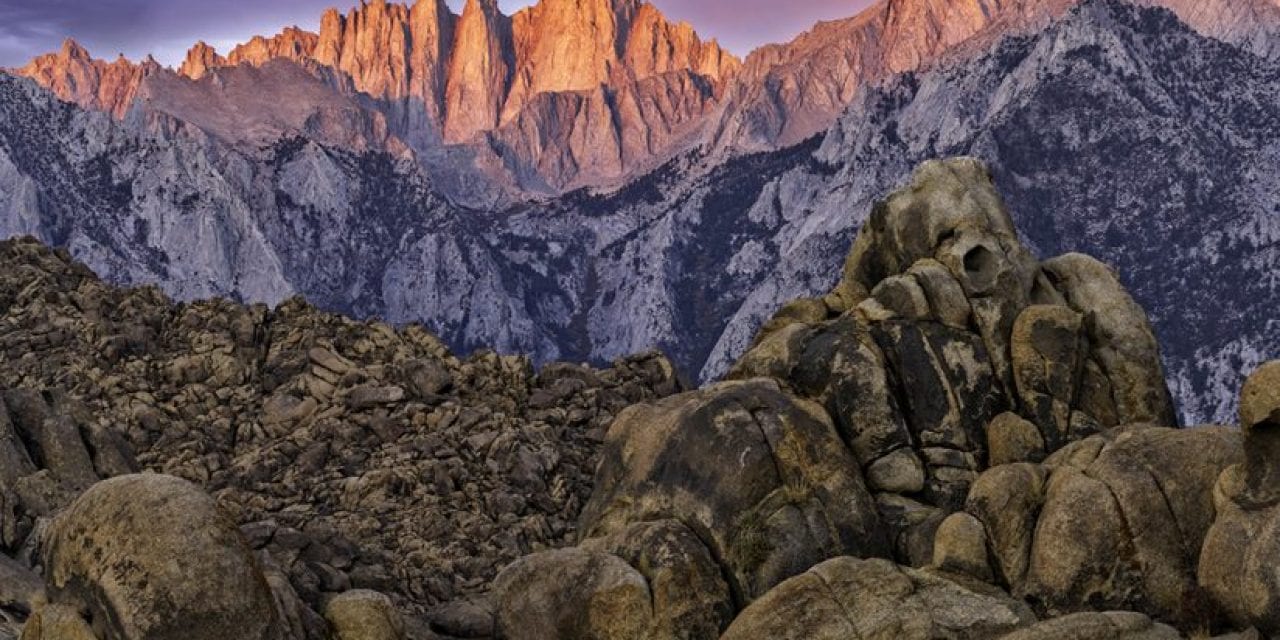
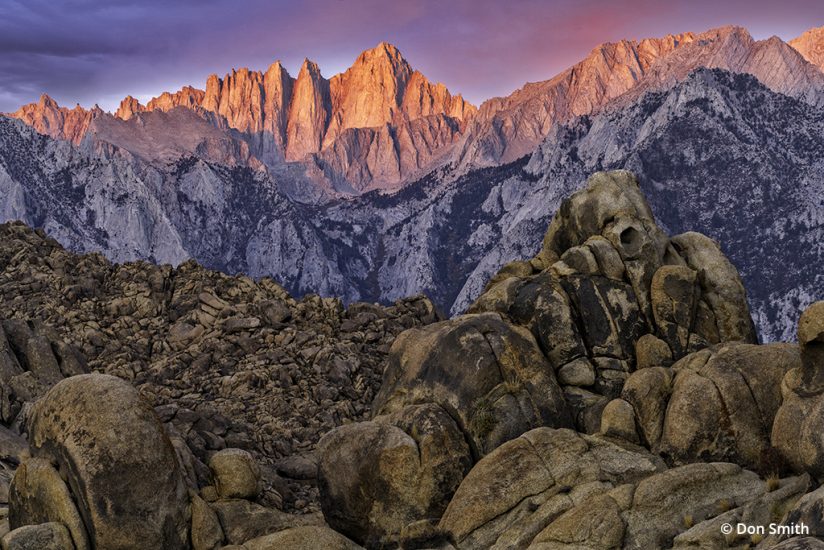
There seem to be a lot of misconceptions out there when it comes to critical focusing for scenes with lots of depth, like my image above captured in the Alabama Hills in the Eastern Sierra. I’d like to discuss hyperfocal focusing and dispel the myths I commonly hear about how to attain maximum depth of field for any given scene.
Let me first define what hyperfocal focusing is and why we would consider using it. Hyperfocal focusing allows one to utilize the maximum range of focus in any given composition, from the first element one desires to be sharp in the near portion of the scene to the furthest element (often times infinity), considering the following pre-determined factors: sensor size (full or cropped sensor), lens focal setting, aperture and distance to subject.
Simply put, a hyperfocal app like Focal from Essence Computing will calculate the closest distance at which a lens can be focused while keeping objects at infinity sharp. When the lens is focused at this distance, all objects at distances from approximately half of the resulting hyperfocal distance out to infinity will be acceptably sharp.
“Acceptably” sharp is based on what looks sharp to the human eye when holding an 8×10-inch print at arm’s length. For example, if I had a composition where the closest element in my scene that I wanted to be sharp was 6 feet away, and I desired sharp focus to infinity, then the range of acceptable focus would be 3 feet (half of 6) to infinity. This begs for one more term you may not be familiar with: “circle of confusion.” In optics, a circle of confusion is an optical spot caused by a cone of light rays from a lens not coming to a perfect focus when imaging a point source.
Today there are plenty of smartphone apps that allow for one to input the above factors and easily calculate where the hyperfocal distance resides. The main problem for landscape shooters, especially those who work around the fringes of the day when light is changing rapidly, is that apps won’t allow for fast calculations. If you miss the light, you will miss the shot. My advice is to frame your scene while on a tripod and run your hyperfocal calculations prior to the extraordinary light arriving.
Dispelling Hyperfocal Focusing Myths
Before proceeding forward with how to calculate hyperfocal distance, let me first dispel two myths that I hear and read about on the web.
The first myth says to focus one-third into your scene. Using my image of Mt. Whitney in the Alabama Hills as a reference, if I was to have focused one-third into my scene, that would have been roughly between the foreground boulders and Mt. Whitney (I captured this scene at 150mm, so there was already limited depth-of-field to work with). Unless I wanted the foreground boulders to become out-of-focus distractions, that theory simply would not have worked.
The second myth says to focus one-third of the way up the plane of your focus. In other words, envision an imaginary tic-tac-toe (rule-of-thirds) grid over your viewfinder (your camera may allow you to already add this as an overlay) and focus on whatever elements intersect the bottom horizontal line. Here’s the problem: If some foreground elements were short and did not reach that line, one might look for another element intersecting this line that lies further into the scene and causes the tiny elements that are closer to the lens to be out of focus. So, we must use some common sense if subscribing to this way of focusing for maximum depth.
Lens & Sensor Considerations
With a full-frame 35mm camera (either DSLR or mirrorless), a 50mm lens is roughly equivalent to how we humans see the world. Any focal length less than 50mm starts to trend toward wide angle, and any focal length greater than 50mm starts to trend toward telephoto. Due to the optics of the lens, wide-angle lenses allow for greater depth-of-field while telephotos allow for less. The further away you get from 50mm on either side, the more (or less) depth of field you will have, regardless of the chosen aperture.
Sensor size also plays an important role in determining depth of field for a given lens. A full frame sensor will allow for more depth-of-field for any given lens while a cropped (APS-C) sensor will not alter depth-of-field, even though the overall reach of the lens will be more. Note that APS-C sensors will not change the bokeh of a given scene, it will just crop the scene for any given focal length tighter in camera, the same as if you cropped an image on your computer; this is important to remember in terms of depth of field. Any hyperfocal app will automatically take this into account when calculating the hyperfocal distance. This is why the first step when using any hyperfocal app is to specify your camera.
Hyperfocal Focusing & Aperture
Another piece of the puzzle is the aperture you choose. With any lens, either wide or telephoto, the smaller the aperture, the more depth of field one will get with any chosen lens. Most lenses perform at their sharpest with an aperture range of ƒ/8 to ƒ/11. However, if I need to go to ƒ/16, I don’t hesitate. Furthermore, if I need even greater depth, I will use ƒ/22.
There is a caveat with using these smaller apertures, and that is diffraction, which occurs when the light is bent to such an extreme using these small aperture openings that softer focus will result—especially out along the edges of the frame. In the real world, I never worry about using ƒ/16 and will only go to ƒ/22 if needed. Most images I shoot at ƒ/22 are very sharp, and I can improve their sharpness further in post-processing.
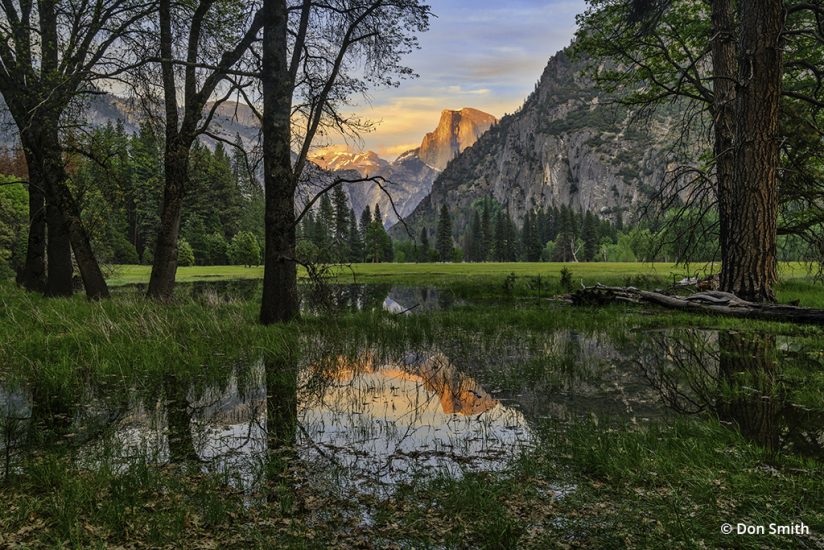
In my spring image captured in Leidig Meadow in Yosemite Valley below, my focus point was just at the end of the foreground grasses where they meet the reflection pond. The resulting hyperfocal point, along with a small aperture of ƒ/16, ensured that I was sharp from the nearest foreground grasses all the way to the distant peaks (Clouds Rest and Half Dome). I had tested my focus point prior to the alpenglow light arriving. When it did, I was confident I had the scene focused correctly, and that allowed me to shoot through the beautiful warm light bathing the peaks.
Through my 40-plus years of photography and observation, it has become clear to me that if something must be soft in the image, I’d rather it be elements that are further away from my lens—it looks more natural to the eye. If I miss the focus on the foreground but have a sharp background, the shot is usually ruined. Our visual system is attuned to gradual declines in either contrast or focus. If possible, I want to have all my elements sharp from front to back in my composition.
Using Hyperfocal Focusing Apps
What about the smartphone apps that I mentioned earlier? Using the Focal app as an example, I will walk you through how easy it is to use. There are plenty of apps available, and they all do the same thing.
The first step is to specify the camera you’re using. For my image of Leidig Meadow, I was using my Sony a7R II (a full frame camera), so I entered that before I began.
The next step is to enter in the foreground subject distance. Remember, the rule of thumb is that you will get approximately one-half of the resulting hyperfocal distance sharp. The goal is to allow the app to find this number and make sure you see the exact range of focus from your nearest to furthest elements (this generally means infinity). In this scene, I focused 10 feet into the scene. The resulting hyperfocal distance was 6.19 feet, meaning the closet element in sharp focus in the scene was approximately half that number—in this case, 3.81 feet.
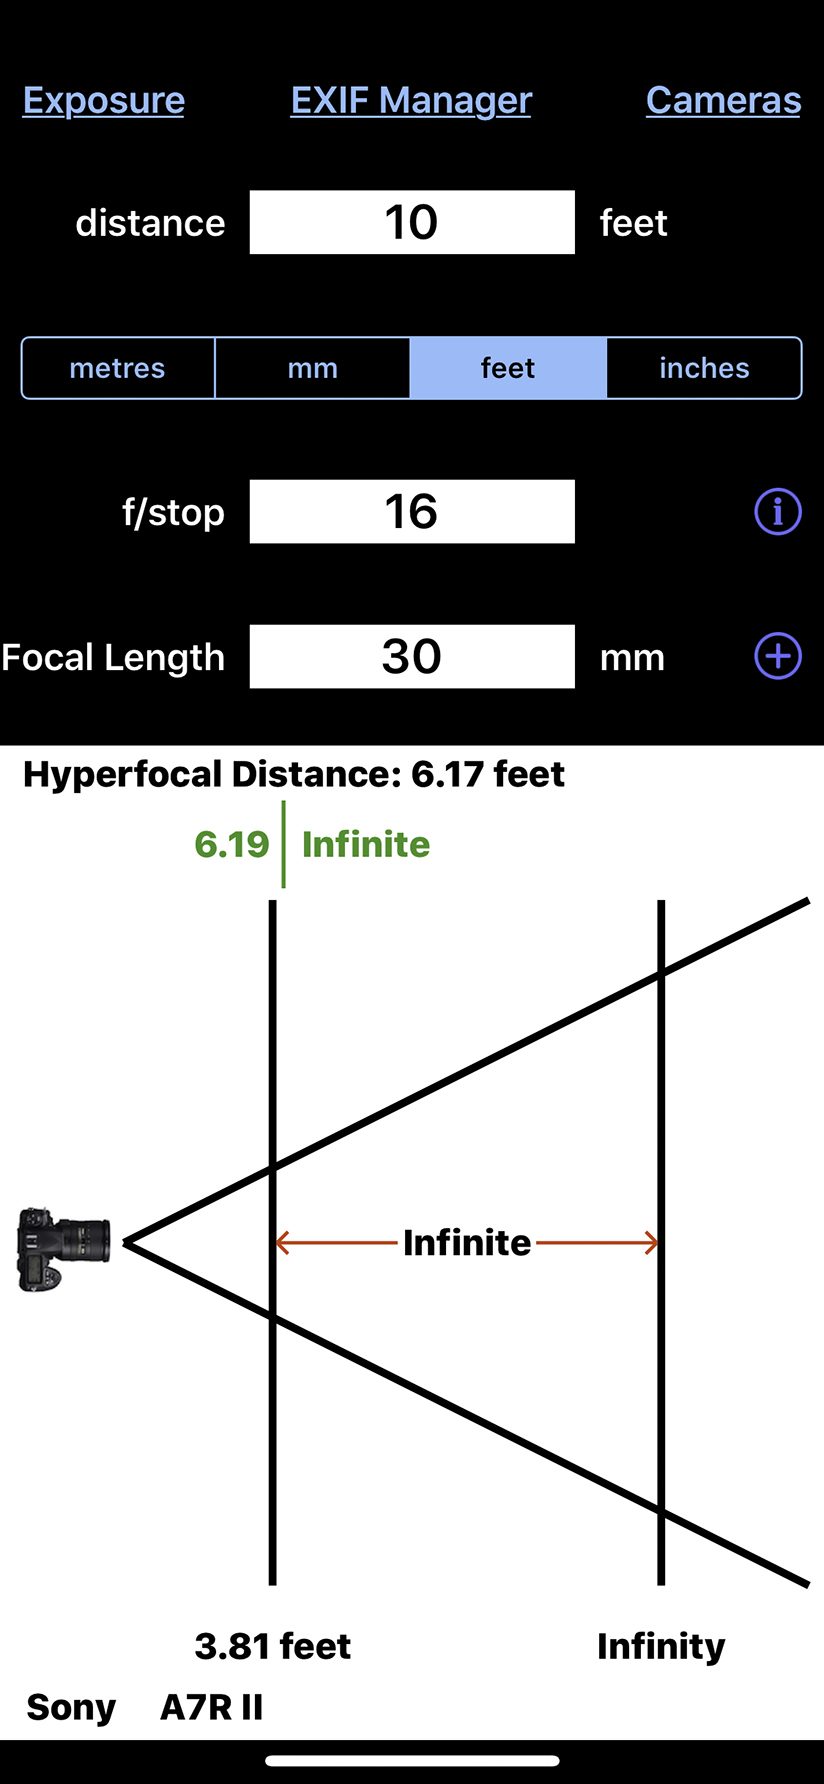
In this image composed at 30mm, I needed the grasses sharp from 5 feet to infinity. As you can see, if I focused 10 feet into the scene at ƒ/16, my range of acceptable focus would be 3.81 feet to infinity. Perfect.
Because I only needed 5 feet, I had some “wiggle room” if I could not get to infinity. For example, I could have focused as far as 25 feet into this scene and still had a range of 4.95 feet to infinity sharp. I would be just shy of the 5 feet I desired.
The bottom line is to always try focusing deeper into your scene if you are not getting to infinity. If you go beyond the minimum focus difference and still could not achieve infinity focus, then the next step would be to use a smaller aperture (in this case, switching from ƒ/16 to ƒ/22).
As mentioned earlier, as we move away from wide angle toward telephoto focal lengths, the depth of field decreases, regardless of the aperture. This is exactly what sports and wildlife shooters desire as they generally aim to have their subject sharp with out-of-focus foregrounds and backgrounds. This allows for the subject to really “pop” off the frame.
Like anything with photography, hyperfocal focusing takes practice. The cool thing is that you don’t have to be on location to learn how to use it. I will experiment with different scenarios when I am relaxing or in a hotel room. The more you experiment, the more you will get comfortable when you do go out into the field. Eventually, with enough practice, you will be able to start predicting hyperfocal distances.
See more of Don Smith’s work at donsmithphotography.com.
The post How To Use Hyperfocal Focusing appeared first on Outdoor Photographer.