Photographers have always struggled with photographing high-contrast scenes often found at sunrise or sunset. High dynamic range, or HDR techniques can help you capture those scenes with greater detail and a “natural” look, if you use the technique properly.
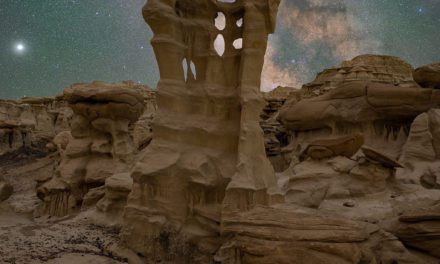
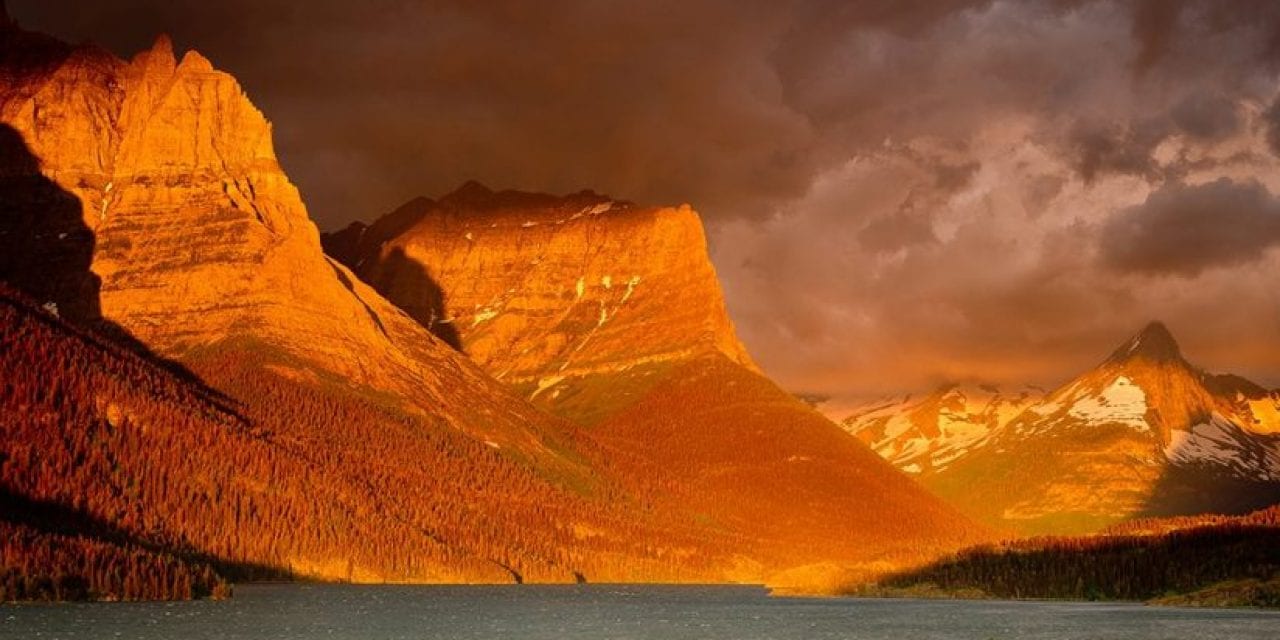
This image from Glacier National Park was shot with a Singh-Ray GND filter way before HDR came of age. While the GND filter worked well for the composition, I wish I had predicted the future and also bracketed frames for future use when HDR became easer.
Back in the film days, photographers like Galen Rowell helped to pioneer the use of rectangular graduated neutral density filters (GND filters) that were clear on one end and dark on the other. These filters were primarily applied by landscape photographers to darken skies or mountains in order to balance with foreground exposures more closely. Use of these filters made it possible to photograph high-contrast scenes that were previously impossible to properly expose in a single frame.
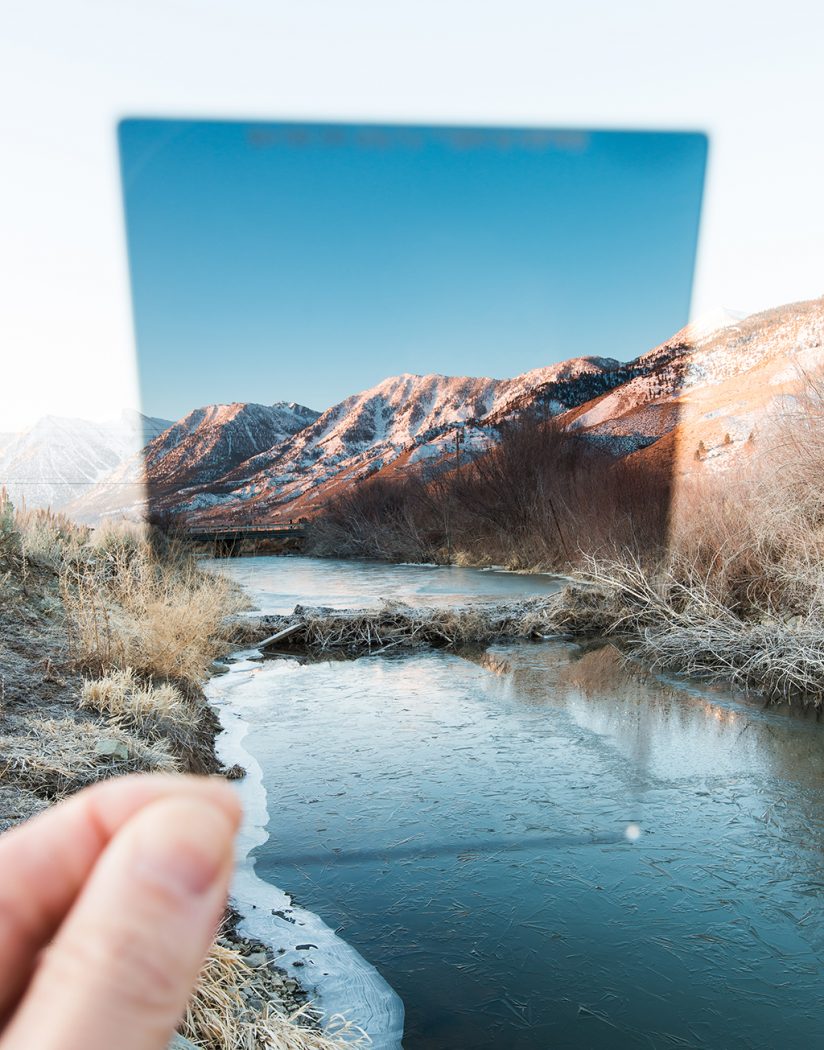
This image illustrates how a graduated neutral density filter can be used to darken the sky to match the foreground.
While technically possible with film, the advent of digital photography brought with it the new technique of blending multiple exposures of the same scene to create a single HDR image. This new technique quickly caught on and became wildly popular, so much so that it created an entirely new style of images showing more detail in the shadows and highlights than the human eye could see in real life. While this trend became popular, it also created a bit of a backlash among more traditionally minded photographers as well as photo editors. We would hear things like, “that image doesn’t look real” or “that photo looks Photoshopped.” I would argue that it also helped erode the general public’s appreciation of a truly well-crafted, properly exposed—and natural-looking—landscape image.
As someone who often works with photo editors, I noticed that some outright banned the submission of HDR images of any kind. At the time, I was a big user of graduated neutral density filters, with my goal being to make scenes look as natural as possible, but I discovered that in many situations, by carefully and tastefully merging multiple images into HDR files, I could actually create images that looked more realistic than if I had I used my trusty GND filters. So realistic, in fact, that I (and many other photographers) was guilty of quietly sending natural-looking HDR images to big-name publishers with no HDR policies and regularly having them chosen and published. At the time, I was mainly using GND filters, but it was clear that the future was going to be with HDR once the process became easier.
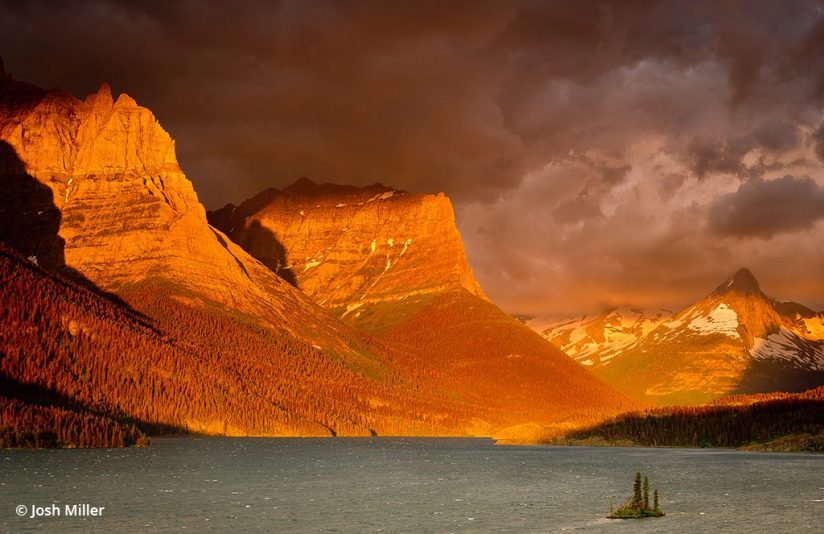
This photograph from Carson Pass near Lake Tahoe is one of my first successful HDR images. While I also shot the scene using a GND filter, I ended up being able to create a more natural-looking image by blending the bracketed files in Lightroom versus the harsher GND-filtered image.
HDR Photography Today
Those first few years of HDR were a bit of the wild west as people discovered what was possible, and some way-over-the-top material gave HDR images a bad name. But fast forward to 2020, and now HDR images are the norm rather than the exception. Software that was once overly complex and often created garish images just a few years ago is now so easy to use, making it possible to shoot high-contrast scenes that photographers just a decade ago wouldn’t even have bothered shooting.
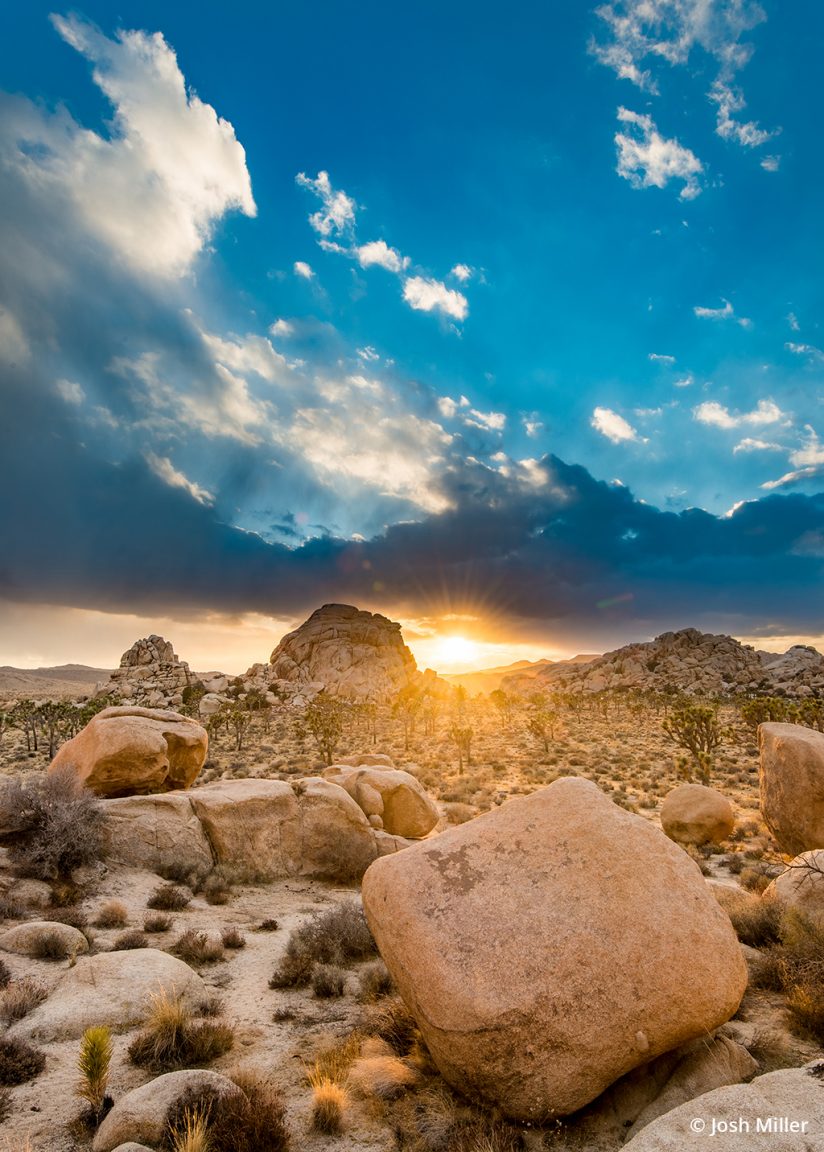
This shot from Joshua Tree National Park is a prime example of a scene where HDR works better than a GND filter. Bracketing for HDR allowed me to hold the sky exposure and also open up the shadows of the rocks. While a GND filter would have worked to darken the sky, I wouldn’t have been able to open up the shadowed rocks nearly as much.
With Adobe Lightroom, we have the ability to create a single blended image from multiple exposures with a click of a button. The composite image can then be further adjusted with all of Lightroom’s tools, but now with much more dynamic range than a single exposure would have—I can open shadows or save highlights many stops beyond what a single RAW file from even the best cameras available can produce. And I’m able to make these adjustments locally as needed, rather than only being able to adjust exposure globally as with GND filters. There are more complicated, specialized HDR programs that might give you a slight edge over the Lightroom method, but Lightroom is so quick and so user friendly that I don’t even bother using those programs anymore.
How To Use HDR
Because of the ease of HDR, one common mistake I see now when working with my workshop students is that they bracket nearly every single composition, even when their camera sensor can easily handle the contrast range of the scene. There are times when HDR is useful to gain information in the highlights and shadows, but there are also times when you are just wasting card space—and, more importantly, your time when editing. When you bracket exposures of every scene, you have that many more frames to wade through when selecting your best images.
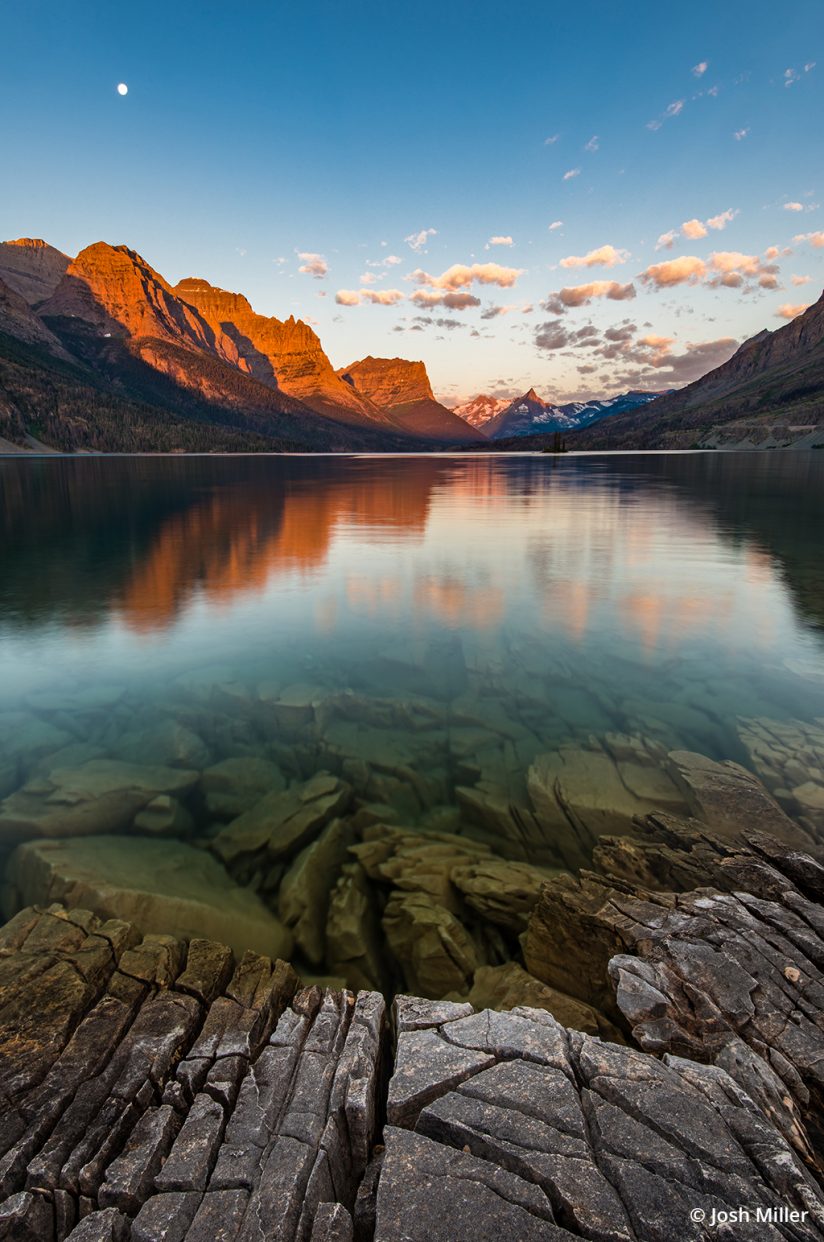
In this photo from Glacier National Park, bracketing for HDR allowed me to control the exposure more naturally in select areas of the image far better than if I had used a GND filter.
The easiest way to see if you need to start bracketing for HDR is to frequently check your histogram to make sure you are properly exposing your scene, and also if you are losing information on one or both ends of the tonal range. Once you begin exceeding the range of the histogram, that is when you start bracketing for an HDR image.
When bracketing, I typically shoot groups of three images (not five), with one shot underexposed, one properly exposed and one overexposed. My exposure adjustment between frames is slightly scene dependent, but typically I bracket in two- or possibly three-stop increments.
Also, remember that what your meter says is properly exposed isn’t always the case. Check that histogram, especially in complicated lighting situations.
Traditional Filters Are Still Useful
You might think the days of carrying graduated neutral density filters are over, but the reality is that no matter how good the abilities of HDR have become, situations do still arise when a GND filter is better.
For most static, tripod-based shooting of landscapes, HDR is usually the best option, but remember you have to bracket multiple frames for blending later. What if you are shooting hand-held or shooting a fast-moving subject? Some or all of your bracketed frames won’t line up correctly anymore. There is some great software magic that deals with “ghosting” or helps line up images, but any time movement is involved, using a GND filter to bring the scene’s contrast back into the range of the sensor is still the way to go.
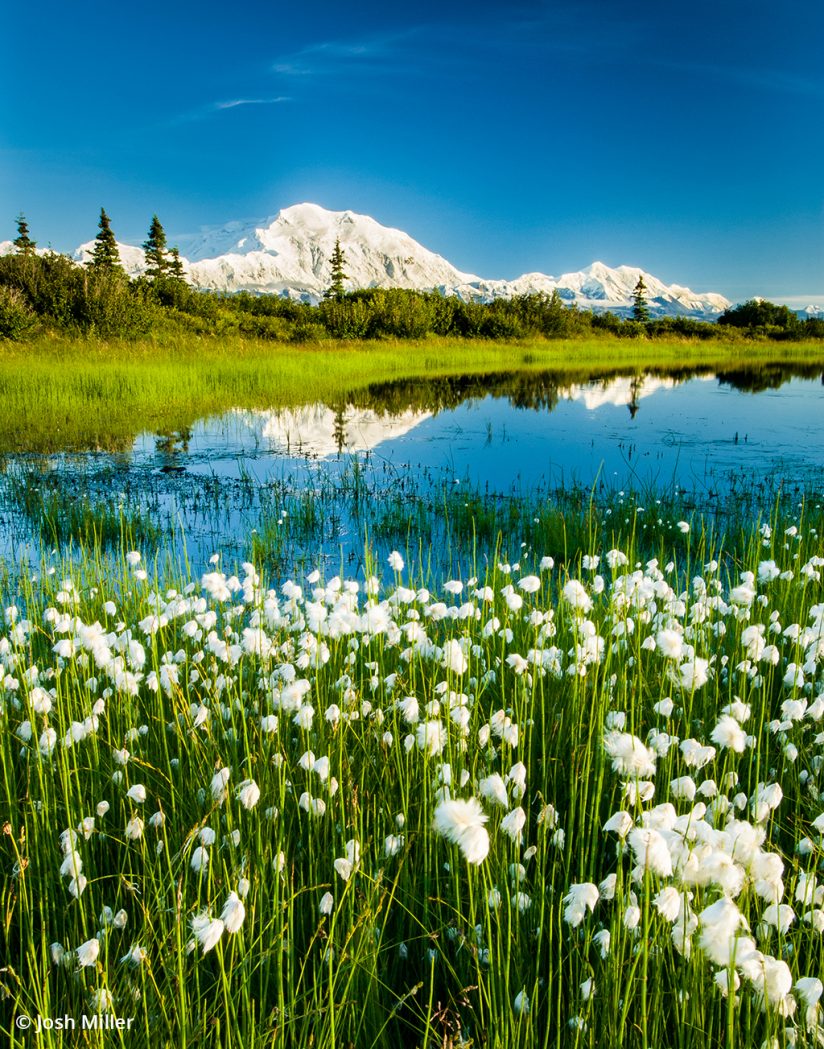
This is one of my favorite images of Denali National Park and is from my very first trip with a digital camera—way before I started bracketing images for HDR. While I used a GND filter with a 6-megapixel camera to create this image back in the early 2000s, it still is regularly published and sells as a print despite being from such a low-resolution camera. If I were to shoot it today, I would bracket for HDR and use a much higher resolution camera, but in the end, the image would look nearly exactly the same.
While we aren’t there yet, looking toward the future, I do see a time when even action shots may be possible without the need of a GND filter. Imagine a camera sensor with more dynamic range than the human eye or a camera that shoots so quickly that it can create an in-camera HDR of a fast-moving subject. I doubt these technologies are very far away. Continuous shooting rates are improving, and sensors get better every year. I would guess that within 10 years, we won’t be talking about HDR images anymore, and none of us will even remember carrying and using graduated neutral density filters.

I know I said you can’t shoot moving subjects with HDR, but this is a shot that breaks that rule. I was already shooting HDR brackets from a tripod when the three swans swam quickly into my frame. With no time to grab a GND filter, I just kept shooting bracketed frames at a fast frame rate (so they would lineup as close as possible). I was blown away how well Lightroom was able to blend the bracketed images using its “deghosting” option to create a single image with three sharp swans.
What a great time to be a photographer. We can create images now that weren’t even possible just a few years ago, and it’s only going to get better.
The post How To Use HDR For Nature Photography appeared first on Outdoor Photographer.