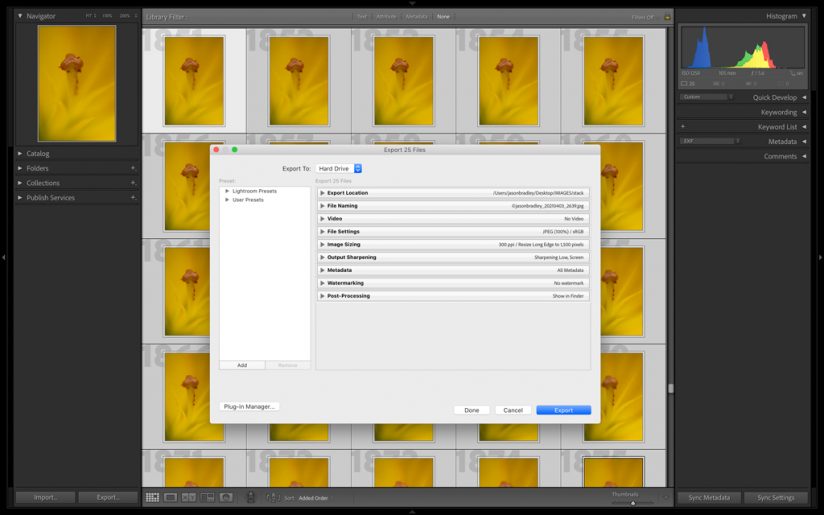
Figure 1. Adobe Lightroom’s Export dialogue.
In part one of this article series on sharing your photos using Adobe Lightroom Classic, I asked an important question: Once we’ve invested in equipment and explored the outdoors in search of inspiring photographs, what’s next for our images? To kick off answering that question, I covered some important fundamentals, including file formats, resolution settings and color spaces. Here in part two, it’s time to jump right into Lightroom’s Export dialogue. I’ll show you how to apply the knowledge from the first article to your chosen settings as you export.
Accessing Lightroom’s Export Dialogue
The first step is to select a set of images for export. You can choose one or many, and there is no limit to how many you can export. If you have 100,000 images in your catalog, you can export all of them at once. (Be prepared to wait quite a while if you do that.) Once you’ve selected a set of images, your next step is to open the Export dialogue.
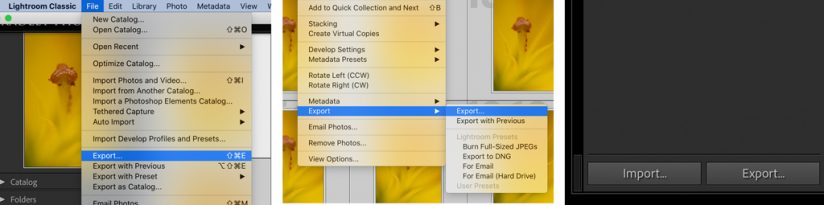
Figure 2. There are a few paths to opening the Export dialogue: From the File menu (left), from the contextual menu (center), and from the button in the lower left corner when using Lightroom’s Library module (right).
As with many things in Lightroom, there are several paths to what you want to do. One way to open the Export dialogue is to look to the lower left corner of Lightroom Classic’s user interface while in the Library module and click on the Export button. You can go to the File menu and select Export. On a Mac, you can hold down the Control key and click on an image thumbnail (or two-finger click), or right-click on a PC to bring up a context menu and then select Export. See Figure 2 to get a visual for each method to open the Export dialogue.
There are three sections to the Export dialogue. At the top is the Export To dropdown menu. Then there’s the column on the left that’s reserved for your Export Presets. Finally, there’s your Settings panels (Figure 3).
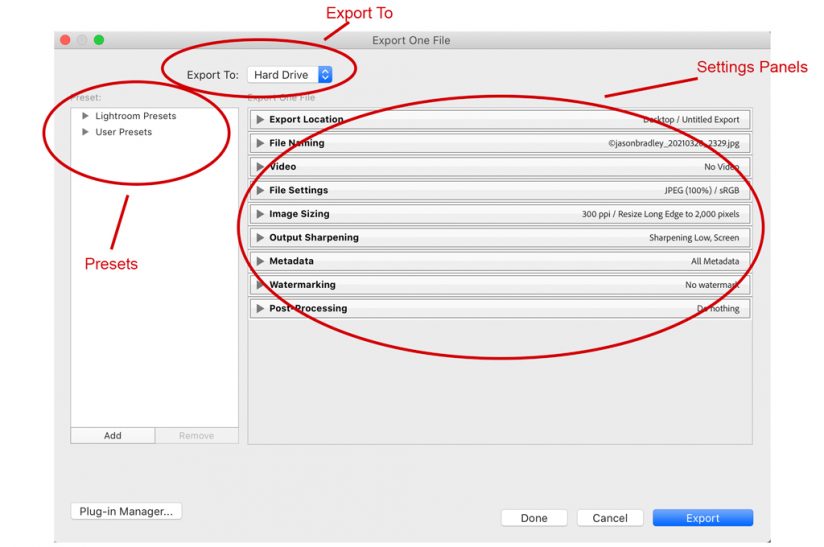
Figure 3. The Export dialogue can be broken down into three main sections: Export To, Presets and Settings panels.
Lightroom “Export To” Dropdown
Every export begins with the Export To dropdown menu, and there are three choices. You can export images to Email, Hard Drive or CD/DVD. Personally, I only export to Hard Drive and then attach images to my emails later. And truth be told, I don’t think I’ve ever exported to CD/DVD. Nowadays, you would be hard-pressed even to find computers that come equipped with that option. If you choose to export to email, you’ll need to set up your email account with Lightroom, which is a bit of a to-do.
So, it’s easy to stick with exporting directly to Hard Drive and then attaching your files to emails as needed, but it’s worth noting that you can automate your Export To Email workflow with a few extra steps. To begin that process, go to the File Menu, then click on Email Photos. An email terminal will pop up. Find the dropdown menu under From, and then select Go to Email Account Manager to start configuring Lightroom to talk to your email account. See Figure 4.
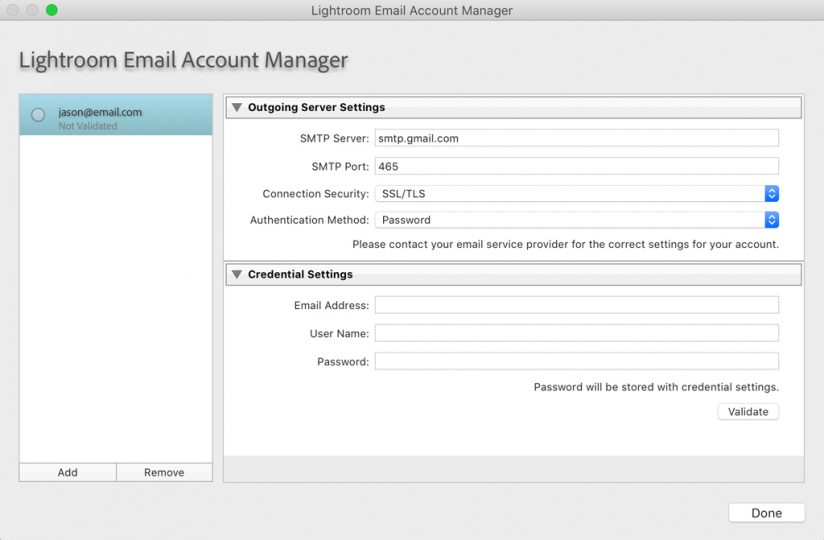
Figure 4. You can connect Lightroom to your email account, so you can email images directly from Lightroom.
Export Location
When you have Export To: Hard Drive selected, you’ll see this panel. (Export Location is not an option if you are exporting to Email or to CD/DVD.)
There are a few things to consider in the Export Location panel. First, there’s yet another dropdown menu labeled Export To at the top of the panel, as shown in Figure 5 below. You can choose from exporting to a specific folder, the same folder as the original photo, or a series of other options. I almost always choose to export to a particular folder but be aware of all the options and choose what works best for you. If you are exporting to a specific folder, you’ll need to click on the Choose button to direct Lightroom to the folder.
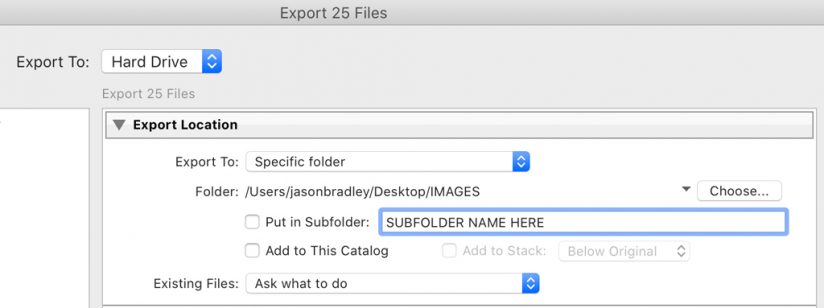
Figure 5. There is a second Export To dropdown menu found in the Export Location panel. This is where you tell Lightroom if you’re exporting to a specific folder, to the same folder as the original photo or other options.
Once Export To is set, there are a few checkboxes to consider. If you check the Put in Subfolder box, Lightroom will automatically create a folder inside of the specific folder you just set. Simply add the name of your new folder to the right of the checkbox. The second checkbox will automatically import and catalog your export back into Lightroom. The last checkbox is Add to Stack, but it’s usually grayed out and only becomes clickable when a few things line up. First, you need to select a set of stacked images along with images that are not part of that stack. Then you have to select Export to Same Folder as the original photo, and then you need to have the Add to This Catalog checkbox checked. I’ve never checked this, but you should be aware of this option if you’re into image stacking.
The last part of the Export Location panel is the Existing Files dropdown menu. This is an important one. The top choice there is Ask What To Do, followed by a few other options that I never use. Personally, I much prefer being alerted to my options if I’m exporting to a folder with files I’ve already exported. I may or may not want duplicates, and I may or may not want files renamed. Being alerted allows me to make that choice on the fly.
Lightroom’s File Naming Panel
The next panel down is the File Naming panel. Simply put, if you want to rename your files, start by checking the Rename To checkbox (see Figure 6 below). For the most part, I don’t recommend file renaming. There is value in maintaining the same file name with all versions of your files. My RAW file for a given image is named the same as my TIFFs, my JPEGs, my PSDs and my PNGs. The file tag is how I differentiate them. If you have a dozen different versions of the same file with different names, it makes it harder to keep track of where things are.
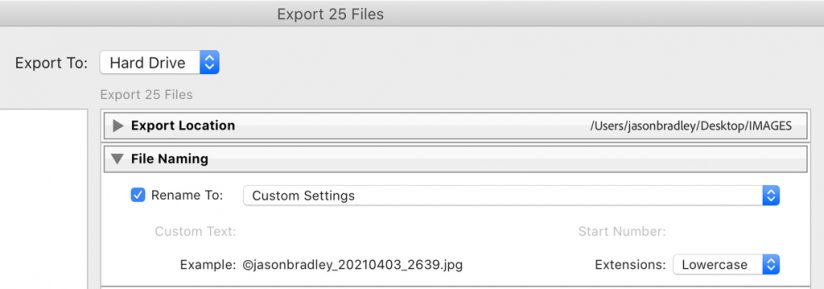
Figure 6. You can rename your files on export by configuring the File Naming settings.
So, almost always leave this checkbox unchecked—but there are exceptions. For example, a client may require a specific file naming convention, or if you’re preparing an image for web use, you may want to include keywords in the file name. In such cases, check the Rename To checkbox and open your dropdown menu to choose from an existing file naming template, or select Edit in the dropdown and create a custom name for your export.
Video Panel
The Video panel is surprisingly simple, considering how much more complicated video can be. Let this panel be a testament to the fact that Lightroom is primarily a photographer’s tool, and its video capabilities are quite limited as a result.
If you have video files selected for export, you’ll need to check the Include Video Files checkbox to use this panel (see Figure 7). From there, your choices are limited to the video format and the quality of the export.
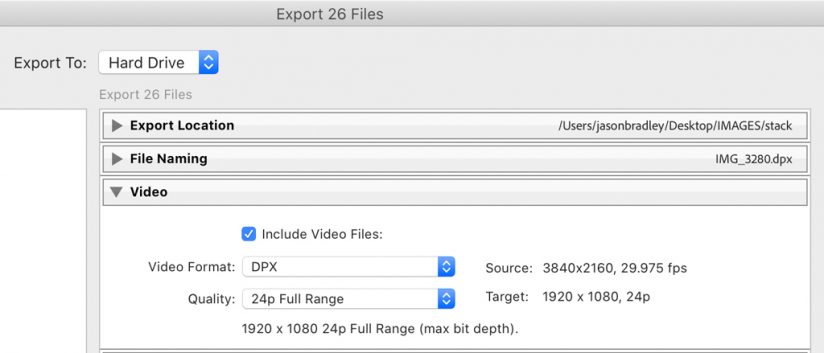
Figure 7. Here’s a look at the Video panel. The first step to activating this panel is to check the Include Video Files checkbox.
You have three format options in the dropdown menu. You can choose DPX, H.264 or your original unedited file. DPX is a lossless compression format and will maintain a better color range than H.264 which, like a JPEG, is a compressed file format to help minimize the size of the file. Though it is compressed, there should be no noticeable loss in quality when exporting for uses like YouTube, Instagram or other online video sharing platforms, so H.264 is typically your export format of choice.
Next is your Quality dropdown menu. Your options with quality change depending on what your format choice is. If you’re exporting a DPX file, for example, your quality choices are 24p, 25p and 30p. If you choose H.264, then your options change to Low, Medium, High or Max. Which you choose, of course, depends on what you’re doing.
The Quality dropdown menu is where it becomes clear how Lightroom’s video capabilities are limited. If I were to export 4K video from an iPhone 12 as an example, I could only export that video with 1920×1080 (HD) resolution. No, Lightroom frustratingly does not export 4K at this time. However, if you want to export for basic 1080p video edits, exporting as a Max quality H.264 is the way to go. If your needs exceed that, even in the slightest, I suggest exporting as Original (the unedited file format) and forget about DPX altogether.
File Settings Panel
I think it’s safe to say that this panel and the following Image Sizing panel are the two most important panels. The File Settings panel is where we choose our export format, what color space we want to embed into our file, our output dimensions and our resolution. And considering their importance, please note that I spent most of the last article of this series going through the different format options, color spaces and what resolutions to choose for different applications. So please refer back to that article to review my recommendations. Here’s how to apply those recommendations.
Starting with the File Settings panel, you have the Image Format and Color Space dropdown menus. The remaining options change with what format you choose, akin to the Video panel.
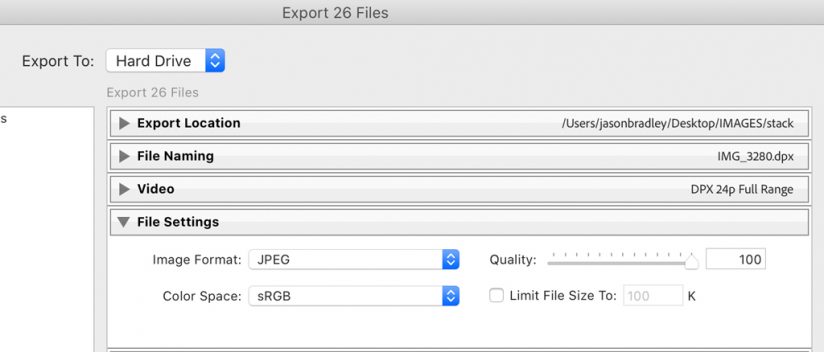
Figure 8. If you choose to export to JPEG format, you can control the amount of compression and/or the size of your file as it’s exported.
If you choose to export as a JPEG, you have a couple of additional options (see Figure 8). You have a Quality slider that controls the amount of compression to apply to your JPEG. Bring the quality down, and the file size gets smaller. Of course, the quality of your file degrades the more it’s compressed, so I almost never reduce the quality of my exports. Alternatively, you can check the Limit File Size checkbox if there is a maximum file size for your intended use and let Lightroom worry about the amount of compression that needs to be applied.
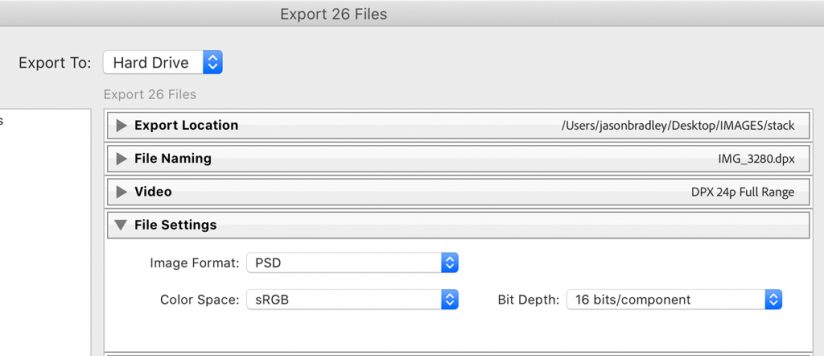
Figure 9. If you export to PSD, your only options are to choose 8-bit or 16-bit color. I suggest sticking with 16-bit if your goal is to maximize your quality.
If you choose to export as a PSD, you only get one additional option (see Figure 9). You can choose to export your file as an 8- or 16-bit file. This refers to the depth of color in your file. Beware that 8-bit is not half the color range of 16-bit. It’s worse than that. The 16-bit is exponentially more than 8. So, I suggest using 16-bit for virtually all of your exports unless you have a clear reason not to. As stated in the last article, PSD (like TIFF) is an uncompressed format that should be used for your large file exports intended for print or other high-resolution types of reproduction.
Like PSD, if you export as a PNG, you can also choose between 8- and 16-bit color. You get no compression considerations or control with PNG, even though it’s a compressed format.
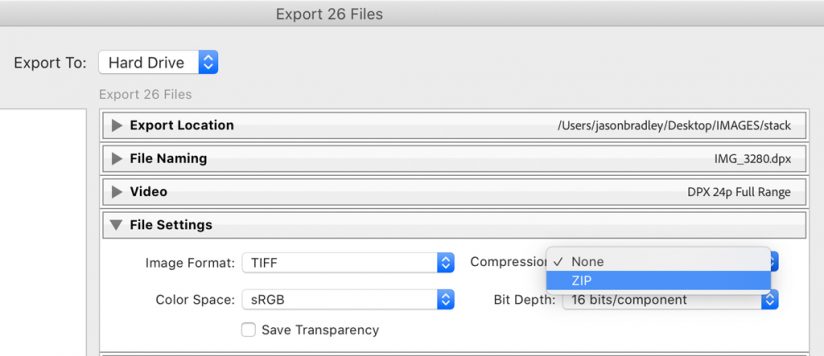
Figure 10. If you export to TIFF, you can choose between 8-bit and 16-bit color and whether you want to ZIP the file or use no compression. ZIP compression is lossless but doesn’t reduce the file size much as a result.
If you choose TIFF, you are back to two options to choose from (see Figure 10). Like PSD, you can choose between 8- and 16-bit color, but you can also choose between no compression or to ZIP the file. ZIP compression is lossless, so feel free to use it to help with file size without concern for quality loss. The downside is that it actually doesn’t reduce the size that much.
If you choose DNG, you get what seems to be a lot more options, but I suggest leaving everything at their default settings (see Figure 11 below). However, if you expect to have a backward compatibility issue with your DNG and the next program you intend to use it with, feel free to change the Compatibility dropdown menu to suit your needs. Other than that, leaving the rest of the options at their default values is a fine way to start.
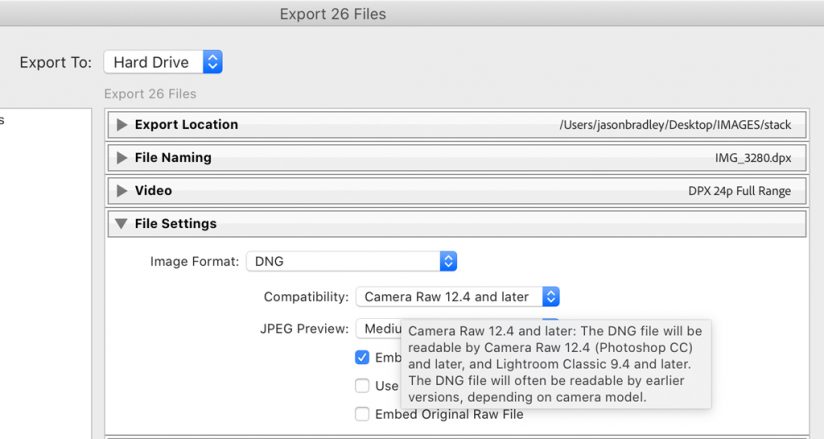
Figure 11. You can also export as a DNG, and I suggest leaving your additional settings at their default.
If you choose Original as your export format, then you have no additional options, you’re just exporting the original file as is, with no developmental or organizational metadata created in Lightroom attached to it.
Image Sizing Panel
Now we move on to the Image Sizing panel. This panel may not be enabled, but don’t worry. Lightroom isn’t messing with you. If you’re exporting a DNG, for example, you can’t use it, as you can’t resize RAW data. And the same goes if you’re exporting in Original format. So, you will use this panel only if you’re exporting a JPEG, PSD, TIFF or PNG and want to output an image at a different resolution than your original.
Step one is to check the Resize to Fit checkbox. Then open the dropdown menu to choose by what criteria you want to resize (see Figure 12 below). You can resize Width & Height, Dimensions, the Long Edge of your file or the Short Edge of your file as well as by Megapixels or Percentage. From there, you can check the box to the right if you do not want Lightroom actually to enlarge your file as you export it, and below you can set your dimensions by way of pixels, inches or centimeters. Last, you can set your resolution by way of pixels per inch or pixels per centimeter.
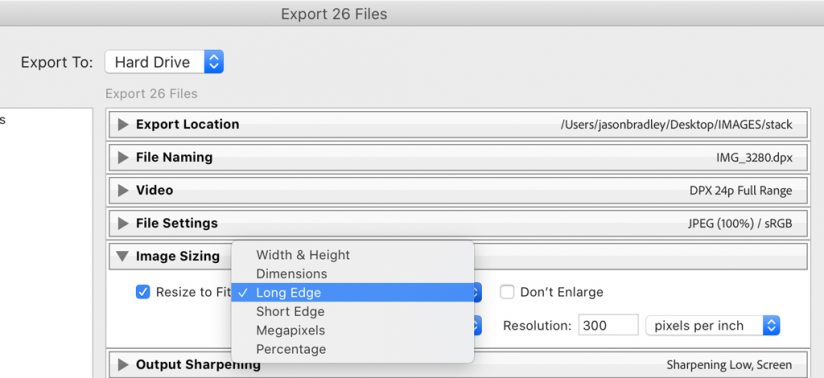
Figure 12. There are many criteria by which you can resize your image in the Resize to Fit.
How you configure these settings is critically important to your export. Please refer back to the previous article to get all my recommendations, but I’ll restate a couple important points here. If you’re exporting a large resolution file for print, as an example, you can set your dimensions to the size of your intended print in terms of inches or centimeters and then set your Resolution to 300 ppi. If you’re exporting an image for social media or other low-resolution output, set your long or short edge of your file to a pixel count and ignore the Resolution. What that pixel count should be depends on where you’re planning on posting the image.
Simply put—if you’re configuring your export for a specific pixel dimension (600×800 pixels, 1600×2000 pixels, etc.), don’t worry about the resolution. If you’re exporting by way of a physical size (4×5 inches), then resolution becomes critical.
Don’t hit that Export button just yet. As I’m sure you can tell, there’s quite a bit to cover with exporting. We’ve thus far only made it part of the way through the Export dialogue. In the next article, we’ll walk through how to apply watermarks to your images and how to utilize and create your own export presets.
The post Sharing Your Photos, Part 2 appeared first on Outdoor Photographer.