When you have been a photographer for as many years as I have, it is time to challenge yourself; it is time to create a “look.” In the art world, each artisan eventually generates a style or brand that becomes easily recognizable. I wanted my photography to be memorable to viewers, not only possessing beautiful expression but also a distinctive uniqueness. In my career, this where the idea of high key and low key lighting in nature photography began to evolve.
Most studies in art or photography touch on this methodology and utilize it in the studio. The technique can produce profound images by isolating the photographic subject against a seamless white or black background. Adjusting intensity and angle of light by deploying strobes or finding a location that offers suitable natural light can create a magical mood. Contrast from side lighting and shadows are optional tools. At both ends of the spectrum, each approach is extremely effective, especially with monochromatic palettes. These are controlled methods employed with somewhat compliant subjects.
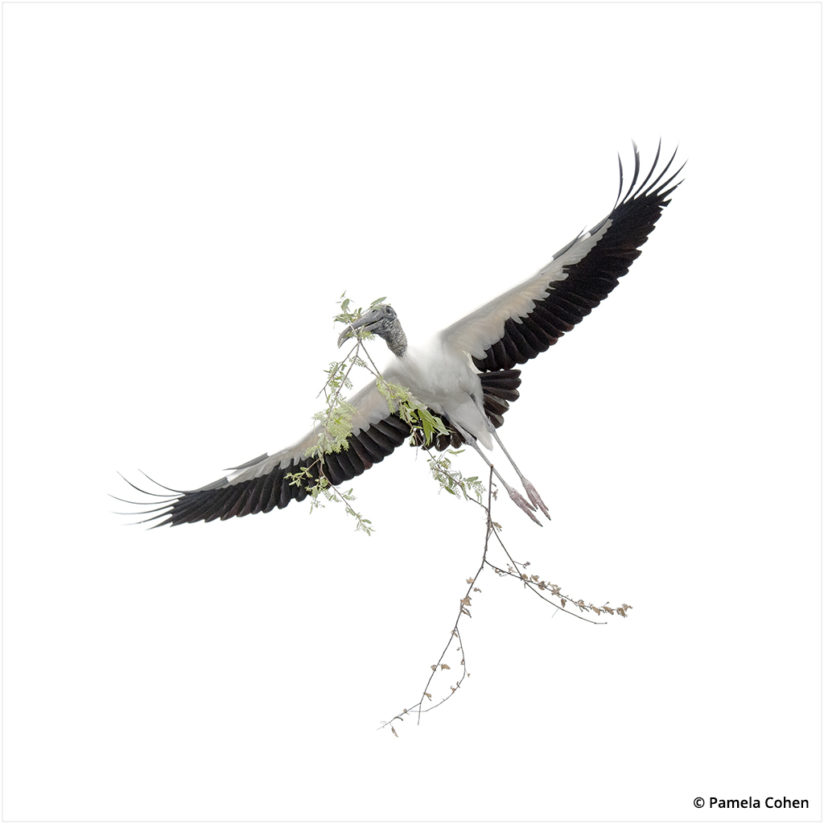
So, how do high key and low key looks fit into the world of an outdoor photographer? I certainly didn’t tell the flying wood stork in my image Bringing Home the Bounty to look my way and say, “Cheese!” Nor can I place it in the sky exactly where the light is perfect with its wings in the proper position. Here is where the spark of creativity and knowledge of technique comes into play.
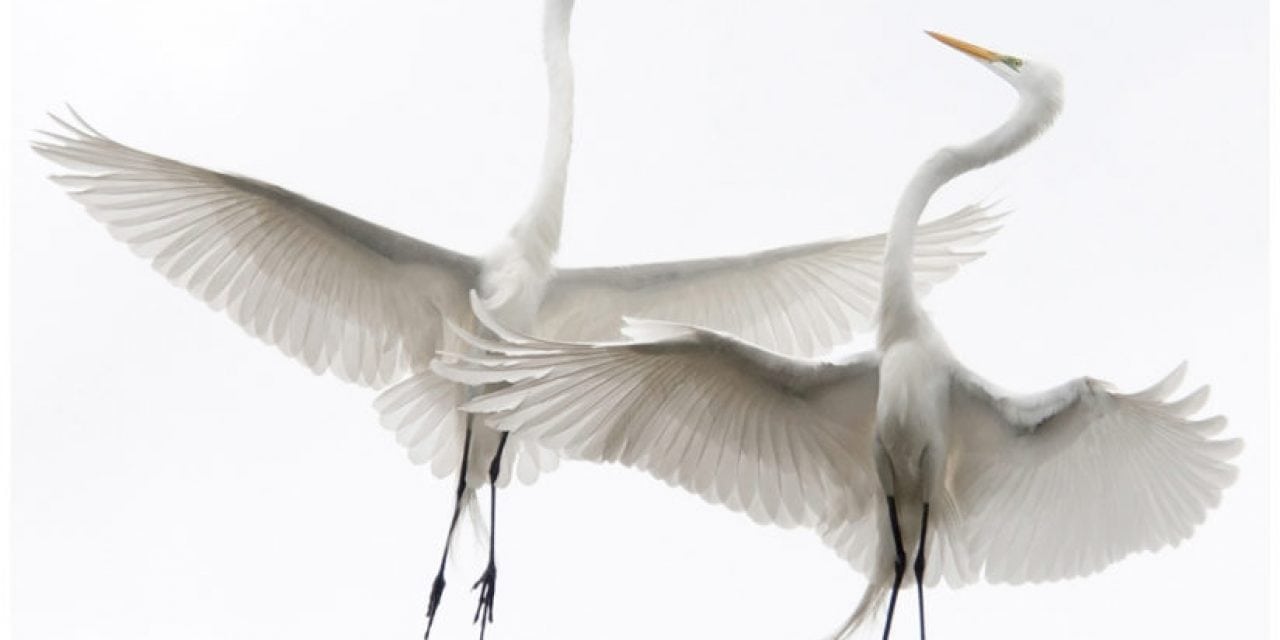
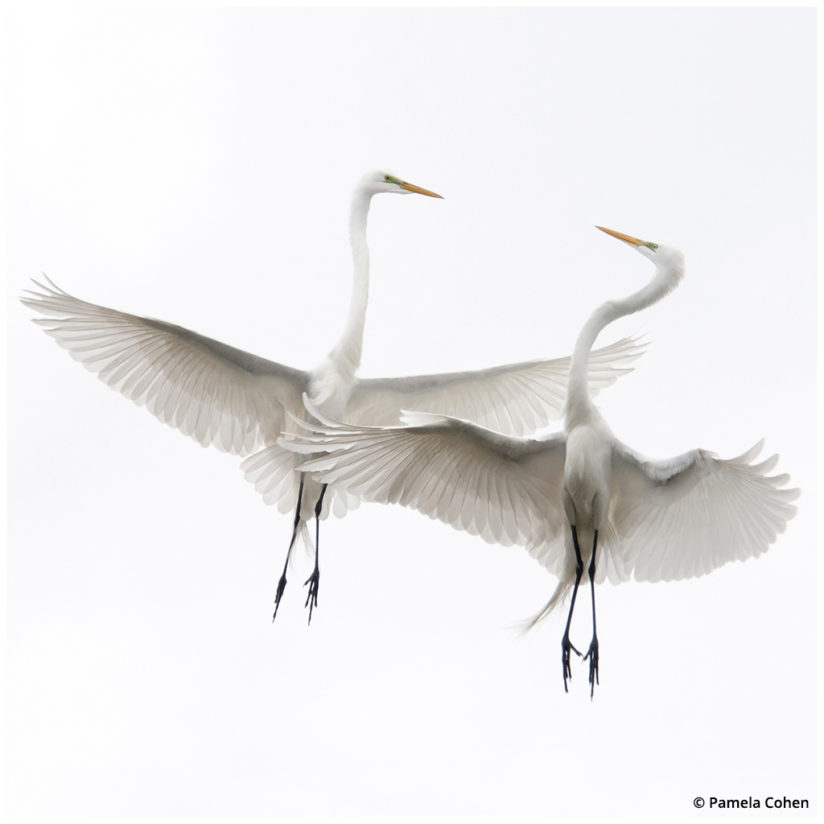
As a photographer and a biologist, I am especially intrigued with large wading birds and their behavior. Photographing a bird of significant size in mid air creates a continuous rush of adrenaline—an essential fuel for me, a “little girl” who carries gargantuan equipment into the field. The winter white look is gorgeous when isolating a bird such as great egret in an uncluttered, blanched sky. The reality of this vision seems somewhat far-fetched, as usually these species are seen flying parallel against a mass of trees and chaotic branches. Thus unfolds challenge No. 1—finding a flying bird in a white sky.
High Key Technique
A necessary trait of a successful high key photographer is to become a “weather freak.” Often, I base myself in South Carolina to accommodate drivable distances to shoot locations in Florida. If the trusty weather apps indicate a probability of clouds at a favorite site, I jump into the SUV and head out to do what I call “bird shopping.”
Understanding the routine of the creature you are attempting to photograph is a definite plus. For example, within most large wading bird species, males transport sticks to construct a nest and entice females to the breeding area. To capture the moment, I know I must be at a rookery on a cloudy day during mating season, well prepared with equipment to suit the circumstances. My SUV is always packed to the hilt, carrying no less inventory than a “portable” major photographic supply company. My equipment of choice consists of two camera bodies: one on a tripod, the other hand-held. Lately, I am outfitted with the Nikon D500 in hand and a Nikon D810 secured onto a tripod. For wildlife in motion, a zoom lens will render better keepers. My arsenal is the Nikkor 80-400mm and the Nikkor 200-500mm. On a 4th Generation M-3.6 Mongoose gimbal head secured to a tripod could be a Nikkor 300mm f/2.8 or the 500mm f/4, with or without teleconverters.
Lighting is what will make or break the final result. An external flash can be used and is very effective when outfitted with an extender. It is recommended to use a powerful strobe set with a high sync speed, mounted above the camera. The extender will concentrate the light and render the background a bit whiter than it would be without. Tones will vary due to white balance, but keep in mind, it is more important to force the values brighter than the midtones on a histogram. Overexposure is necessary but not to the extent of blowing out highlights. Two modes are most successful: aperture priority with positive exposure compensation, perhaps + 1 or + 2 EV, or full manual exposure. It is imperative to shoot in RAW, as many times the white balance will appear somewhat bland with slight gray tinges that will require the post-processing flexibility possible with a RAW file. A large aperture will minimize the depth of field and allow a softer background. Smooth panning with the bird in flight at a shutter speed that is fairly high, usually at 1/1000th sec. or greater, will also be necessary. The metering mode will depend on the subject in the composition. During a day with compromised light, it is mandatory to be cognizant of the camera’s exposure settings—aperture, shutter speed and ISO.
Low Key Technique
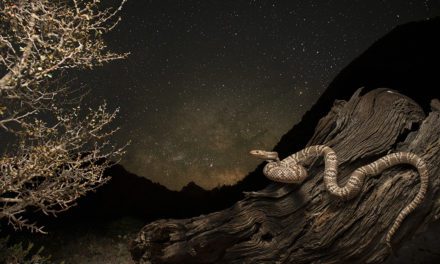
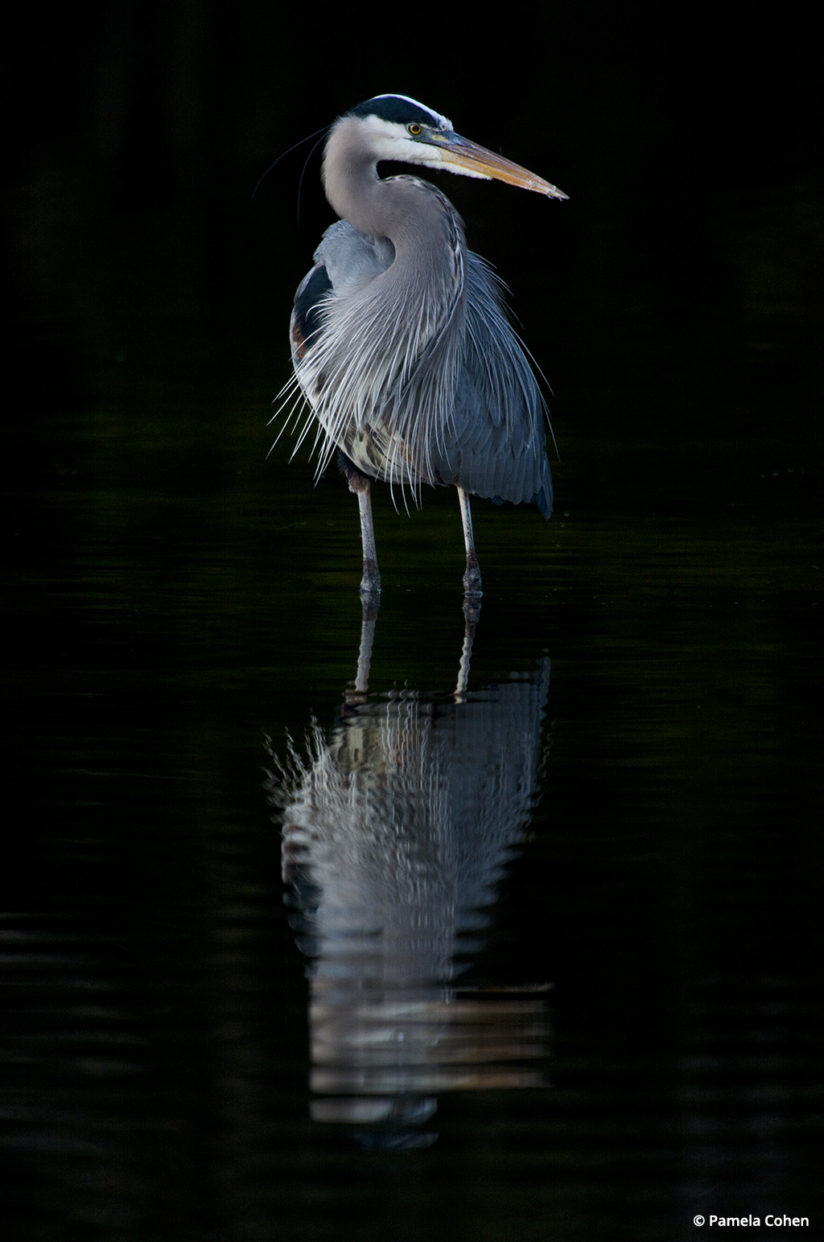
On the opposite end of the spectrum, using the low key effect, images are dark and contrasty, with a black or smoky gray backdrop. This approach provokes a totally different perspective and feeling of drama. The feathers of a species or other prominent features of a subject can be accentuated and rendered with pleasing visual effects. Using reflections, such as on an opaque black pond, can provide extraordinary results. Often, people who view my photography in the gallery think the fine art images are actually paintings because of the intricate detail. My reply: “I paint with my camera.”
Thinking about attempting low key photography at night? Use my philosophy, “Walk softly and carry a big lens.” Aesthetically, there is nothing more serene than being alone with nature as daylight ends; the enchantment of twilight triggers creativity. It is important not to disturb wildlife; therefore, staying quiet, keeping distance and using a large prime lenses will do the trick. Such is the case with wildlife portraiture in Pelican’s Evening Swim and Heron’s Night Reflection.
Focus must be precisely on the subject’s eye, so I never rely on autofocus, as the camera may randomly set the focus point on undesirable areas. Most of the time, it is necessary to use a long-reaching fill flash with an extender such as the Better Beamer or MagBeam to illuminate perfectly. Though some photographers shy away from flash, I prefer using it over a high ISO setting on the camera. Even though my cameras are tested for high ISO capabilities and software is available to compensate, there still can be evidence of noise on the files when producing a print of significant size shown as a gallery image. Usually, the lowest ISO setting for a stationary subject in the dark would be ISO 400. A larger aperture will most likely be required. Always try to meter the subject correctly, keeping the histogram toward the left.
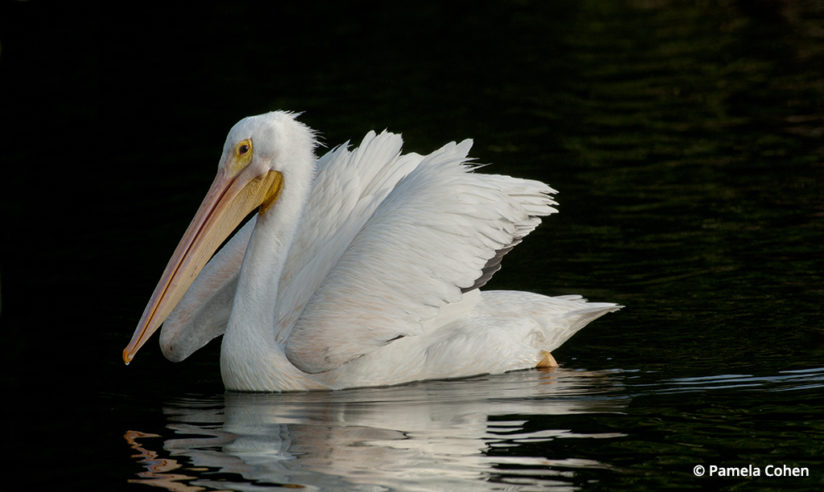
Pelican’s Evening Swim was made at a pond in J.N. “Ding” Darling National Wildlife Refuge in Florida. This species of white pelicans migrates here and is not a full-time resident. I photographed them earlier in the day but had visions of how incredible a low key image would look. To highlight the magnificent creatures, I wanted to accentuate the ivory plumage; surely a dark pond would suffice as the perfect black backdrop. With dusk approaching, all gear prepared, head net secured to protect against the ferocious mosquitoes, all there was to do was wait for the right moment. Compositionally, I thought it best to concentrate on one bird and create a portrait. The pelican swam, I photographed to my heart’s content and a smile radiated under the head net as I viewed the camera’s monitor. The swirls in the ebony pond reflection reminded me of well-thought-out brushstrokes an artist could have painted with a finely controlled brush. To make the image even more magical was a solitary droplet of water remaining at the end of the pelican’s beak.
High Key And Low Key For Other Subjects
These techniques are not limited to wildlife. They can successfully be used for macro and landscape photography as well. The enigma of what may be found in the wild along with these photographic applications can yield exquisite images. The attempt is to transport the viewer into a realm of subject isolation in the monochromatic background. Aesthetically, when we photographers can erase all that is extraneous, yet infuse and extract the enticing essence of the wild environment, we are truly successful. The high key and low key methods should be experimented with, as they truly broaden the range of innovation and artistry for photographers who dare to challenge themselves and their imaginations.
See more of Pamela Cohen’s work at pamelacohen.com.
The post High Key And Low Key Light For Wildlife appeared first on Outdoor Photographer.