In the previous articles in this series on keeping your photos safe, we’ve clarified what dangers threaten our data and discussed the commonly overlooked details of a photographer’s backup workflow. We looked at how DNGs can protect against data decay or bit-rot, backing up your catalogs, creating redundancy for your catalog’s metadata, and what RAID drives and Drobos are, along with other hardware.
In this fourth and final article of the series, we’ll talk about a framework that brings all of these elements together. What do we do day-to-day, and how do we practice a sound backup workflow? Even though I can split these ideas into another four-article series, let me attempt to distill them for you. My main challenge in doing so arises as I try and predict who you are. I know some of you have image archives of modest size, and some of you have large archives of well over 10 terabytes, but most of you likely have something in between. Usually it works out that the more data one has, the deeper down the technical rabbit hole one goes.
And so, without getting too technical, allow me to generalize, providing an overall framework. Meaning, there are certain principles and steps I think all photographers should follow regardless of the size of their archives, while other aspects of your workflow should be fine-tuned to fit your lifestyle and needs. I’ll do my best to make suggestions for each kind of photographer along the way.
The 3-2-1 Rule For Keeping Your Photos Safe
In the first article of this series, I covered a couple crucially important things. First, everything can, and at some point will, go wrong. Secondly, the best hardware in the world isn’t going to save you, so you have to start thinking in terms of redundancy. And so, in the spirit of redundancy, I’m talking once again about what I previously referred to as triple redundancy because, well, the safety of the fruit of all of our labors depends on it.
The generally recommended practice for redundancy is the 3-2-1 Rule. This rule tells us that we should, at all times, have our work stored on a primary drive, then backed up to a second drive, and then to a third drive, at a minimum. Of course, this third drive is to protect you against a catastrophic failure triggered by things beyond our control and imagination and acts of god. To do so, we need to keep that third copy off site and safely away from your first two copies.
Here’s an example of why offsite backups are so important: Type “How Toy Story 2 almost got deleted” into Google and check out the cute, but also scary, YouTube video of how the entire “Toy Story” sequel, with a budget of nearly $100 million, was almost totally lost. In short, the primary copy of the film was accidentally deleted, and because of some technical glitches in creating backups that were never properly checked, the film was believed to be all but lost. But out of pure luck, the film’s technical director had recently had a baby and took a copy of the film home so she could work from home. Can you say “close call!?”
Most of us aren’t working with a $100 million budget, nor are we working with the technology, storage servers or a team of people managing our libraries like Pixar. However, the 3-2-1 Rule applies to Pixar as much as it does to us. The story illustrates that things happen, without warning and beyond our imagination, not to mention that floods, earthquakes, fires, robberies, tornadoes, hurricanes, wild animals, UFO abductions and supernatural events all happen. It’s all possible. Henceforth, store your data on one kind of external drive system, back it up to a second, and then back it up, at a minimum, to a third that is kept off-site. And unlike that story from our friends at Pixar, don’t just trust that your backups are happening. Test them as you go.
Folder Organization & Archiving
For my first tip in this department, keep everything—and I mean everything—in one folder. You can label this folder “Images” or “Archive” or whatever, and put all the images in your library in that folder. I’ve seen too many photographers with crazy folder systems, where some folders reside on their desktop, some on external devices, and others on different computers altogether. In short, don’t do that. I mean, don’t do that! Trying to find everything that needs to be backed up if it’s scattered all over is challenging even for the heartiest of brains. And of course, the larger one’s library grows over time, the more challenging this all becomes.
Of course, folder organization can go beyond the simple “Images” folder on your backup drives. Think again about Pixar and how their initial copy of the film was accidentally deleted. Well, I’ve actually done this and then made a backup that then also reflected the accidental deletions of those files. Like Pixar I got lucky, but it was scary. Nowadays I archive everything that I delete. Or everything I delete gets put into a special folder called “Archive.” Pro tip: Get backup drives that are twice the size of your primary drive. This provides a buffer so you can archive deleted files in addition to your main image folder(s) without the worry of deleting work accidentally.
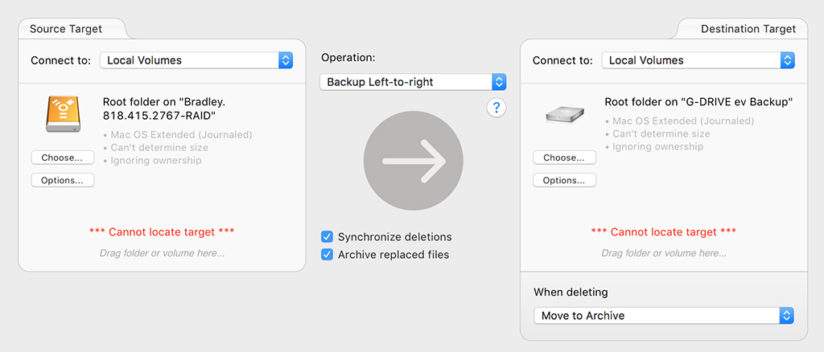
In article two of this series, I highlighted the use of synchronization software such as ChronoSync for Apple computers and Beyond Compare for Windows. Another program for Windows I forgot to mention is GoodSync. One of the key features to these programs is they have the ability to archive as you go, and it’s easy to do. Using ChronoSync as an example, by choosing the option to “Move To Archive”as shown in Figure 2, ChronoSync will move your deleted files to a separate folder that archives your deletions. Nothing is deleted, so you won’t lose a thing, even if you do something goofy like Pixar or me.
If you don’t want to learn a synchronization program, and want to just drag-and-drop your folders to create a backup, you’ll have to find another hard drive to archive all of your images to protect against accidents. The pitfall for losing stuff lies in the method by which you drag-and-drop. Meaning, if you drag your “Images”folder from your primary drive to your backup drive, and you overwrite the “Images”folder on your backup, then you populate your backup with any changes you’ve made—accidental or intentional. You might simply choose to not overwrite your folder and create a new backup “Images”folder each time you do a backup. But for anyone who doesn’t have a small data set to work with, that is not a sustainable solution over the long term.
Alternatively, you can have another backup drive where you’ve copied all of your image downloads. You can organize them by date, so it’s easy to track things down in the future if needed, but that ensures that, again, nothing is lost.
Of course, another layer of redundancy and automation one can add to the workflow is using cloud services. Like learning to use synchronization software, working a cloud option into your workflow is yet another thing to learn. But cloud services today are very easy to use, very secure and quite affordable. And if you have large image archives, some companies have solutions for you to transfer your data without relying on slow internet bandwidth.
Cloud Storage
For whatever reason, the idea of the cloud still scares people. I’m not sure why, but there’s little to nothing to fear nowadays. Encryption technology is impenetrable if you’re using a halfway reputable company, and although we are talking about a three-layer redundancy approach in this article, most cloud services backup their data servers much more than that, and while using different geographic regions on completely separate power grids. Understand that the entire business of a cloud service is structured around not just storing your data but keeping it safe and accessible.
Google, Amazon, Carbonite, Microsoft and Backblaze are some of the more popular companies offering easy-to-integrate and affordable cloud options. But out of all of them, I must say that Backblaze and Carbonite offer the best bang for one’s buck. That said, I believe they are for two different kinds of users. Carbonite seems to be best for the user with modest-size archives of about 1TB or less, for the user who is less adept at working with computers or learning new systems. I say this because Carbonite, which is comparable in price to Backblaze for personal home use, has a customer service department that you can actually get on the phone during normal business hours. I find that extremely valuable. Backblaze relies on email support or live chat only during business hours. They do offer an upgrade service for those who want and need 24/7, on-the-phone customer support. But the fee for that is prohibitive and not for the average user.
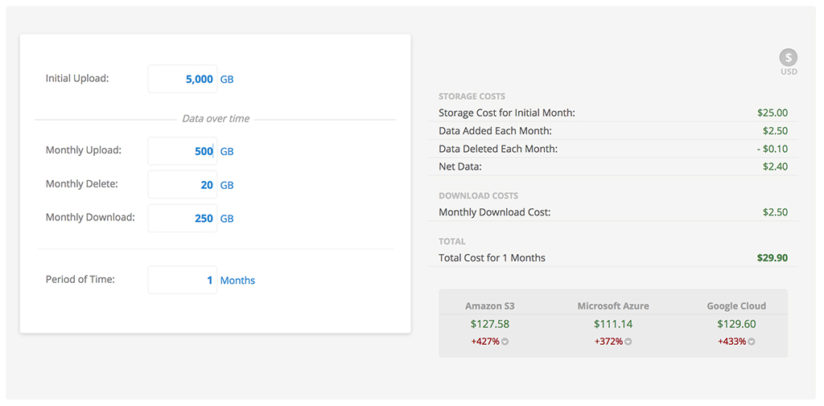
Also, I say Carbonite is for users with “modest”-size libraries because you can only add to your cloud archive through the internet. Meaning, if you are a photographer starting out with a 5TB chunk of data, you are forced to transfer all of that over the internet. Even if you have good internet upload speeds in your home, that can take a month to upload. Alternatively, Backblaze’s B2 service offers the ability to import large chunks of data that are too big for a reasonable internet transfer. It is not free, but they can send you a 110 GB drive for $99, a 3.5 TB USB hard drive for $189, or its Fireball service, where it sends you a 40 TB drive array for $550 (each requires a refundable deposit as well). Backblaze is also the most affordable of all the cloud service options I’ve found, and one of the easiest to use. Carbonite is $6 per month for personal use, Backblaze is $5 per month, and each offers unlimited backup capacity. Backblaze’s B2 service is charged by the gigabyte. Storage is $0.005 per GB per month and $0.01 for each gigabyte downloaded. Figure 3 shows a breakdown of what that may look like for a user with 5TB photo archive who is working a lot with their library.
In any instance, I highly recommend considering jumping in and using a cloud service in addition to, or in replacement of, your third copy of your data, which I recommend you keep offsite anyway. I’ve been using cloud services for data storage for many years.
Step-By-Step Workflow For Keeping Your Photos Safe
We’ve covered a lot of information during this article series, and we need to try to make some sense of it all. Allow me to therefore attempt to line things up. Know that the goal in doing this is not to tell you in that it’s my way or the highway. On the contrary; workflows are supposed to be tailored to accommodate each photographer’s lifestyle and needs. Thus, my goal is to show you the steps of a typical workflow, the workflow that I use, and provide you with the tools that you need to customize a workflow for you.
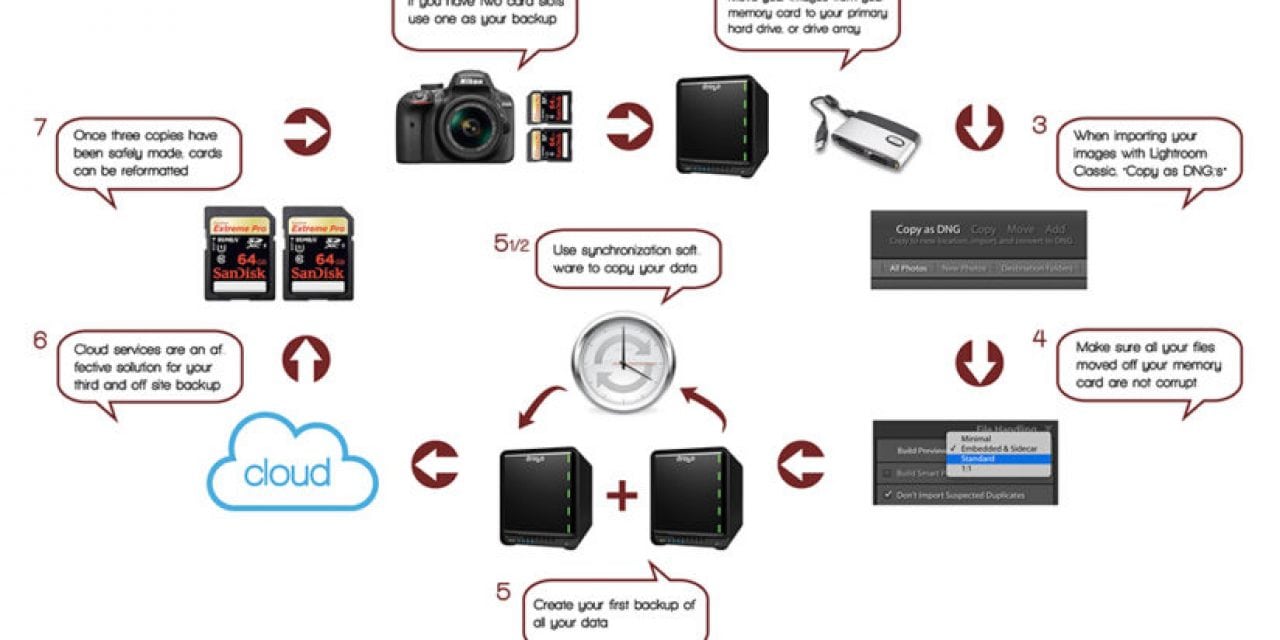
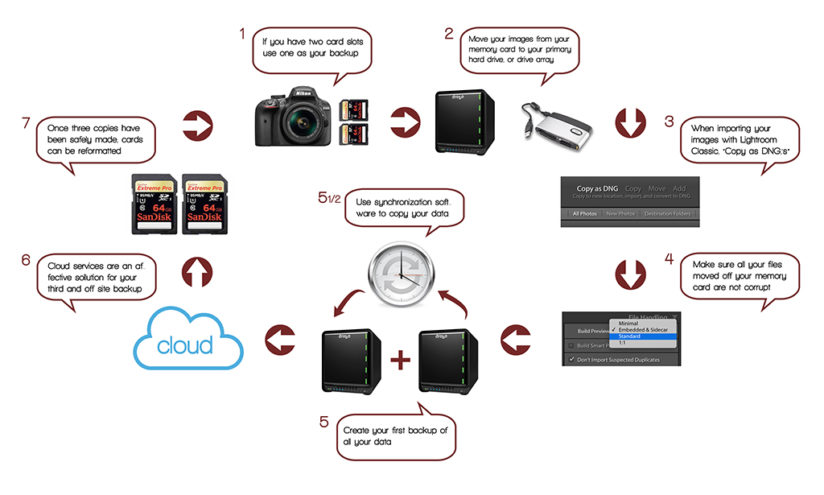
But to be clear, I’m not suggesting you skip crucial steps that keep your data safe. I’m just not concerned with whether or not you use portable drives versus drive arrays, cloud services, synchronization programs or whatever. The numbers for each step illustrated in Figure 1 at the beginning of this article correspond to the numbers and steps laid out in the next section. Note that these steps refer to topics covered in earlier articles in this series and are not necessarily covered in this article—be sure to read the previous articles for a complete understanding.
Backup Steps For Initial Image Ingestion
1. Backups can begin while shooting and in-camera. If your camera accommodates two memory cards, set up your second card slot to be a backup for slot 1. Remember to have your cards’ capacities and speeds match.
2. After your shoot, move images off of your memory card and onto your primary hard drive.
- For extra storage capacity needs and redundancy and safety, use a drive array like a RAID with two or more drives, or a Drobo for your primary drive and your backup drives.
- Transfer your images into one folder, where all of your photos are kept.
- Do not reformat your cards until after all data has been backed up, and then backed up again.
3. Lightroom users should “Copy as DNG”during import. Creating DNGs embeds the ability to later “validate” files that have been backed up or transferred to secondary drives or that have been stored for extensive periods of time.
4. To make sure all your images transferred from your memory card are not corrupt, Lightroom users should build previews upon import and perform a visual inspection to make sure all files look good.
5. Back up your data onto a second hard drive or drive array.
- Use software to synchronize your data from your primary to your backup drive, such as ChronoSync for Macs or Beyond Compare for Windows.
6. Use a cloud service to create a third copy of all of your data. Be sure to synchronize your data from your primary drive, not your secondary drive, with your cloud service.
- If you prefer to use another hard drive or hard drive array for your third copy, make sure you are uploading data to this third copy after each shoot, trip or after an extensive amount of developing, keywording or labeling work is done to your archive. You don’t want to merely protect your images. You want to protect all the work you’ve done to those images.
7. Once your data has been successfully copied three times, it is safe and you can reformat your memory cards in your camera.
Maintenance Steps
- After performing a chunk of work in Lightroom Classic, make sure your metadata is saved not only to the catalog but also is saved to your files as well. This step protects all of the work you’ve done in Lightroom in the event of a catalog corruption or failure.
- Catalog backups: Make sure you back up your Lightroom catalog after each work session where you are adding a substantial amount of either organizational or developmental metadata.
- Make sure you are backing up your Lightroom catalog in a separate location from your original catalog. You can certainly use one of your backup drives.
- When using synchronization software, have your software archive your deletions.
At the risk of being redundant: Your choices of hardware, cloud services or synchronization software are important but not the most important factor in keeping your photos safe. Nothing can truly protect all of the work that you’ve invested so much time, money and emotion to create, other than redundancy coupled with throwing little to nothing away. Always practice safe backups. Your photos deserve it!
• • •
Read All Articles In This Series
Keeping Your Photos Safe, Part 1: Don’t Touch Anything!
Keeping Your Photos Safe, Part 2: Tools Of The Trade
Keeping Your Photos Safe, Part 3: Protecting The Big Little Things
Keeping Your Photos Safe, Part 4: Backup Workflow
The post Keeping Your Photos Safe, Part 4: Backup Workflow appeared first on Outdoor Photographer.