Savvy photographers know efficiency is essential when it comes to an optimized digital workflow. The ability to organize, sort and edit RAW image files in a single application makes ACDSee Photo Studio Ultimate 2020 the ideal software for Windows users who seek to streamline their workflow without sacrificing power and control. New features in the 2020 version make the application more powerful than ever. Better still, the $149.99 one-time purchase price means there’s no commitment to monthly subscription fees.

We’ve been watching the evolution of this all-in-one RAW workflow solution in a series of articles over the last few years, so if you aren’t familiar with the software, be sure to check out our reviews of ACDSee Photo Studio Ultimate 2019 and ACDSee Photo Studio Ultimate 2018 for a better understanding of just how versatile and powerful it is.
Though it remains reasonably priced, the application includes several new and improved features. A new HDR tool helps to maximize dynamic range in contrasty situations by merging multiple exposures into a single image, and upgraded digital asset management (DAM) tools allow for improved facial recognition and detection—meaning the application can identify and tag subjects in your photos based on names already in your database.
Another new feature is called Blended Clone. This editing tool is designed to simplify the process of removing unwanted elements from an image by painting them away—sort of like a mix between Photoshop’s Smart Erase and Clone tools.
Exciting as these additions are, there’s no new feature that’s more talked about than focus stacking—which offers the ability to merge multiple images shot at different points of focus into a single image that’s sharp front to back.
What Is Focus Stacking?
Focus stacking is the technique of blending multiple images of stationary subjects (such as landscapes and macro close-ups) in order to increase depth of field. Macro photography, for instance, produces shallow depth of field even at small apertures.
Whatever the situation, when we want greater depth of field than what is achievable in-camera, we can turn to focus stacking. The process starts by capturing several exposures at different points of focus with the camera stationary on a tripod, then layering those frames together to “stack” the focus. In the past this process required manual layering and masking, but with Photo Studio Ultimate 2020 it can all be done automatically. Here’s how.
Focus Stacking In Photo Studio Ultimate 2020
The fastest, easiest route to a focus-stacked image is done in just a few steps in the software’s Manage Mode.
Step One: Collect The Component Images
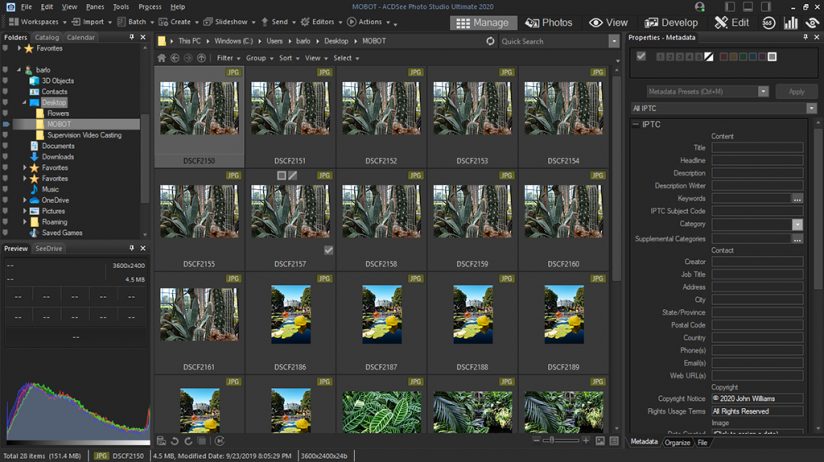
Open Photo Studio Ultimate 2020 to Manage Mode and use the Folders pane to navigate to the folder that contains the images you’d like to work on. Click on the folder and the photos within will appear in the center of the screen as thumbnails. Be sure to use photographs that were shot on a tripod such that the composition remains the same from image to image, and the only thing that changes is the point of focus.
Step Two: Select The Images In Order
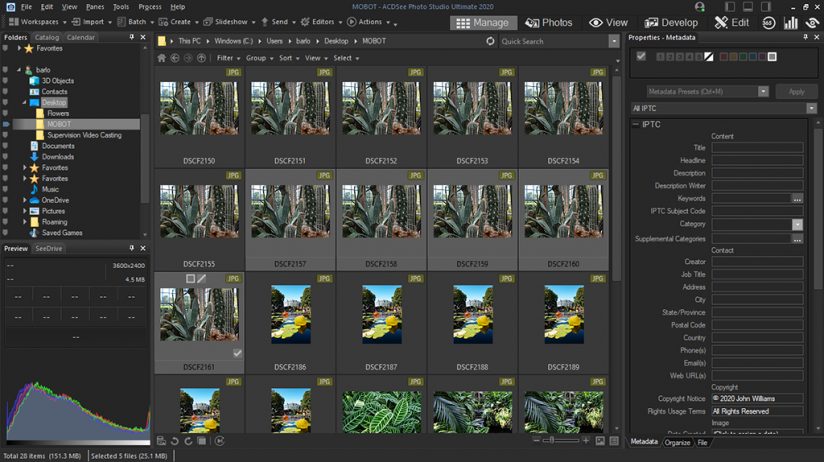
While holding the CTRL key, click on each image you would like to include in the focus stack. Don’t do this randomly, however. For the focus stack to work correctly, the images must be arranged in order so that the in-focus area moves either front to back through the scene, or back to front. Click on an image and drag it to reposition the series in the correct order, then proceed to hold the CTRL key while clicking on the images to be included in the stack. (If they are in an unbroken sequence, you can click on the first image and then shift-click on the last to select the series.)
Step Three: Choose Automatic Stacking
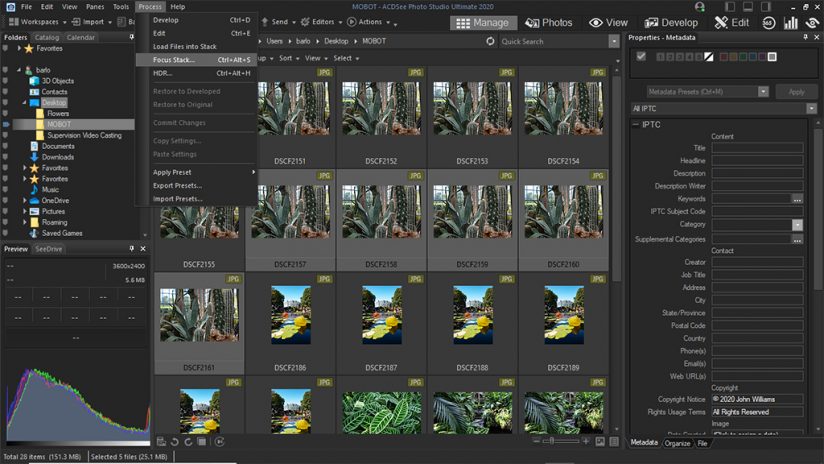
From this point there is a fundamental choice to be made regarding the approach to the focus stack. You can choose the automatic method or an option that provides for a little more input and control. First we’ll look at the easy, automatic way. With the images selected in Manage mode, click on the Process menu heading and choose Focus Stack from the dropdown menu (or simply type CTRL+ALT+S).
Step Four: Confirm Your Images Are In Order
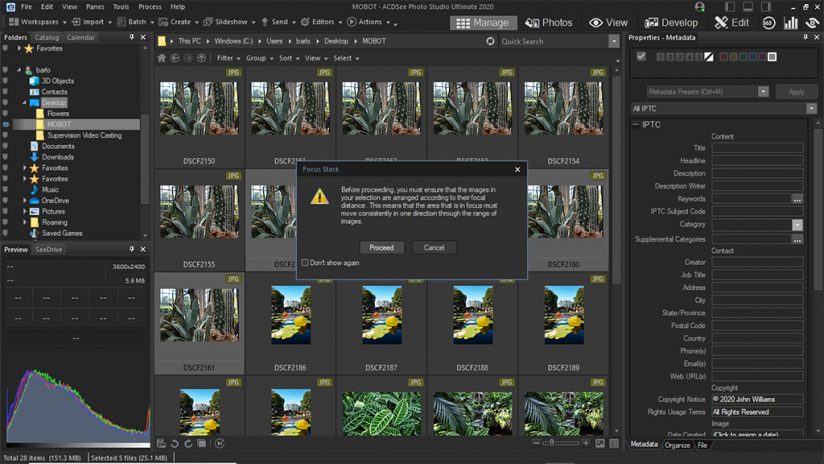
After clicking on the Focus Stack menu item, a warning dialogue box will appear reminding you to ensure that the images in the selection are arranged according to their focal distance. If they are, click Proceed. If they’re not, go back to Manage mode and click and drag to rearrange the images.
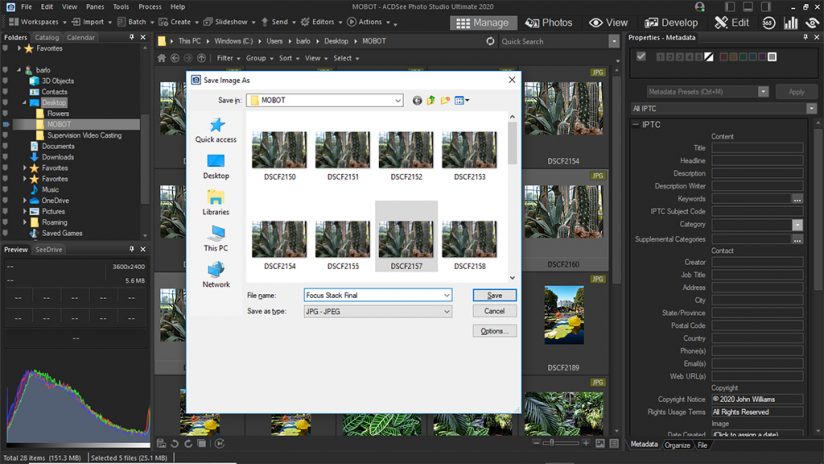
Step Five: Save The Final Image
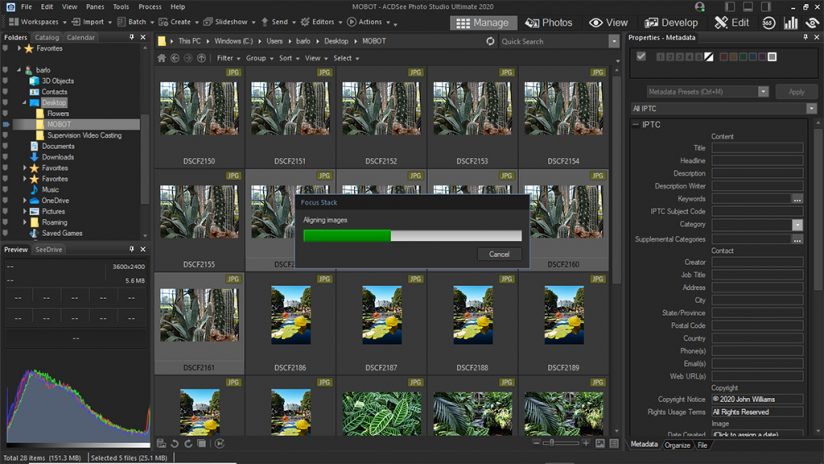
The focus stack will then load the images and align them automatically before blending them, showing progress bars as these processes happen. Soon a Save Image As dialogue box will appear, asking you to choose a file name and location to save the new Focus Stack blended image.
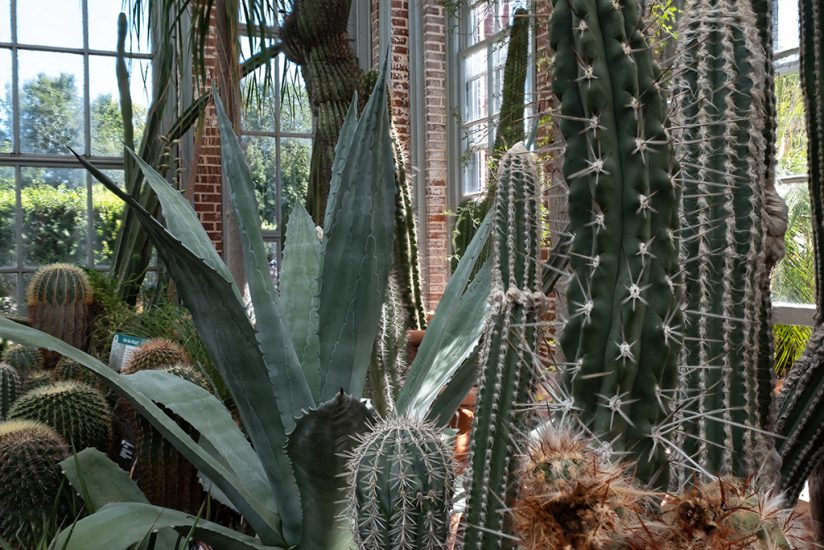
Here’s the final image. Notice the sharp details from near to far:
For More Advanced Control, Try This Method
For photographers who want more control—including the ability to fine-tune the focus stack settings and blending—go back to step two above and proceed in a slightly different manner by using the Edit mode.
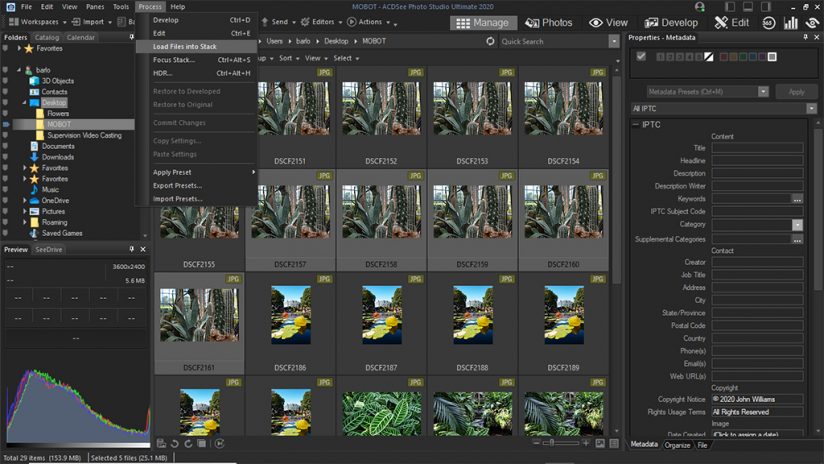
In Manage mode, again select the images to be used in the focus stack by ordering them correctly, and then control-click (or shift-click on the first and last photo in the range) to select them. Then choose Load Files Into Stack from the Process menu. Photo Studio Ultimate 2020 will then load each of the selected images into layers, switching automatically to Edit mode.
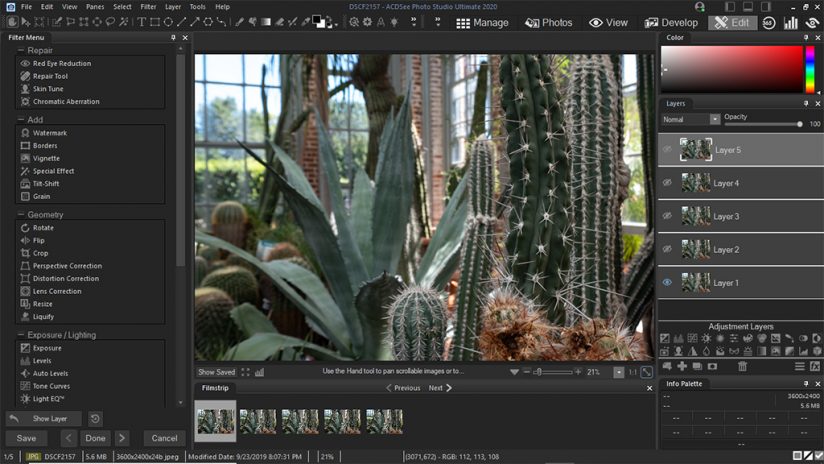
Next, from within Edit mode, verify that all the images you wanted in your stack are included in the layers, and that they are ordered correctly. Again, it doesn’t matter if the frames progress in focus from near to far or far to near, just that the focus point moves in a single direction through the series.
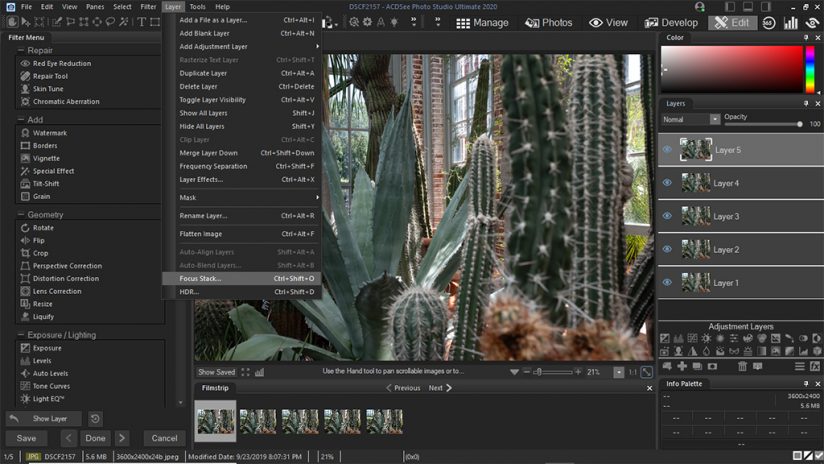
From here, click on the Layer menu and look for Focus Stack near the bottom—or simply type CTRL+SHIFT+O to initiate the focus stack. As before, a warning will pop up to ensure the images are ordered correctly.
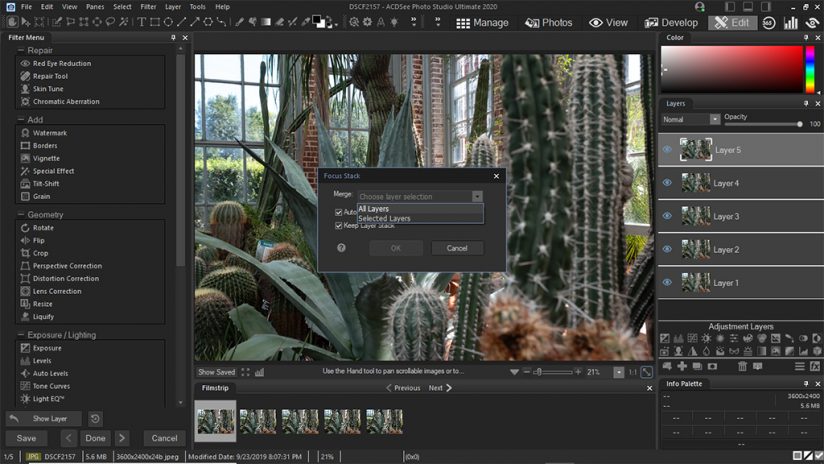
The Focus Stack popup window will appear, offering a few options for the process. First is a dropdown with two options: merging All Layers or just Selected Layers. Assuming you’ve only loaded images into the layers that you’d like to include in the focus stack, choose All Layers. If not, go back and select the layers you would like to include before initiating the process again, this time choosing Selected Layers.
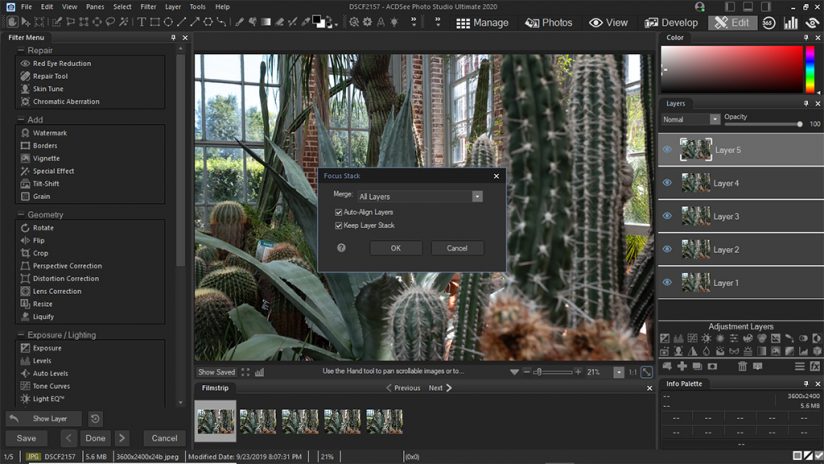
The next choice is whether or not to auto-align layers. This approach is generally preferable in order to account for slight variations that might have occured from frame to frame. Left unchecked, the frames will be aligned as shot by default, which can make for some less-than-ideal blending. Also ensure that the Keep Layer Stack button is checked. This will retain the original image layers with the merged focus stack layer appearing atop them, as opposed to discarding them when the stack is complete.
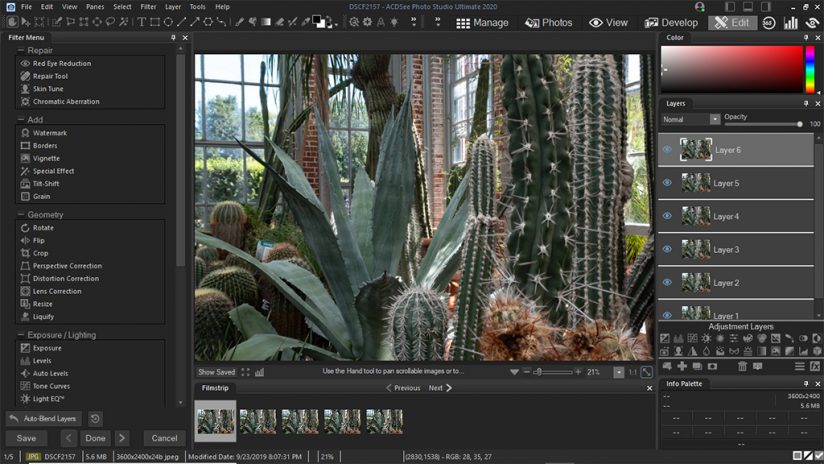
Once it’s finished, the newly blended focus stack will appear as a new layer atop the Layers pane. From here you can selectively blend the focus-stacked image with the original layers below using layer masks, opacity controls and other layer-based effects.

To use layer masks to selectively paint away focus, right-click on the focus stack layer and choose Set Mask White to apply a transparent layer mask. Then choose the Brush from the toolbar below the file menu and adjust its size and opacity using the options that appear above the preview pane. With a black paint color selected, simply click and drag to paint transparency onto the focus-stacked layer. If you go too far with the mask, simply switch to white paint color and paint in the mask, restoring the visibility of the layer.
ACDSee Photo Studio Ultimate 2020 provides incredibly powerful control over focus stacking for users who want it, and a fully automated solution for those who don’t. But focus stacking is just one of the many powerful tools that this complete RAW workflow software provides. For more information, including additional new features, or to download a free trial, visit the ACDSee Photo Studio Ultimate website.
The post ACDSee Photo Studio Ultimate 2020 appeared first on Outdoor Photographer.